Doesn't it seem like as soon as the weather turns cooler you just want to turn the oven on? Well, the weather started changing around here around the middle of October and sure enough I spent two Saturdays in a row baking lovely things for breakfast and sharing. The warm sweet aromas coming out of the oven and the occasional burst of bright sunshine through the orange and red leaves makes fall a not so bad time of year after all.
Making sweets or baked goods while following a traditional foods lifestyle can be challenging for a couple of reasons. Evidence is stacking up from all sides that sugar and simple carbohydrates in refined flour are just not good for you. Sally Fallon recommends the use of rapadura, an unrefined cane sugar, instead of refined white sugar or adapting a recipe to use honey or maple syrup. These sweetners, while still very high in sucrose and fructose that can wreck havoc on all but the very most stable blood sugar levels, do contain some of the trace nutrients of the original plant material. Traditional wisdom reminds us that tempering our sweets with adequate fats can help regulate our blood sugar so I always try to include nutritious ingredients and a full compliment of butter, eggs or coconut oil.
The other problem with baking is the problem of grains. Sally Fallon teaches us that though whole grains are more nutritious than refined grains, they need to be processed properly in order to neutralize anti-nutrients and release their full potential. The usual methods for neutralizing phytates are soaking in an acidic medium, sprouting or fermenting using sourdough methods. I won't even get into gluten free baking, oy! Sprouted flour can be used in any recipe that calls for wheat flour with minimal or no changes to the process. Soaking and fermenting require completely different processes and honestly, are a bit outside my range of motion on a typical Saturday morning. I take comfort in the knowledge that white flour, though not adding much nutrition, is not removing vital minerals through the action of phytic acid. My baked goods are treats, not staples in my diet, and so I don't worry too much.
This recipe, though, circumvents most of these problems by being grain free and refined sugar free. It is based on a recipe in the great cookbook White Trash Cooking by Ernest Matt Mickler, a lovely collection of authentic recipes reminiscent of the author's childhood in rural Mississippi. The original is called Sweet Potato Pone and is a mix of baked sweet potatoes, heavy cream, molasses and eggs baked into a sweet treat. I subsituted the sweet potato for canned pumpkin and the heavy cream for coconut milk to make a healthful, easy baked treat for any Saturday morning.
Pumpkin Molasses Custard (or Pone, if you prefer)
1 can canned pumpkin (or 2 cups mashed cooked pumpkin, winter sqash or sweet potato)
1/2 can coconut milk (or 1 cup heavy cream or evaporated milk)
3 eggs (or 2, if that's all you got)
1/2 cup molasses (give or take - a big hearty glugg out of the jar will do)
spices to taste - I used 2 tsp cinnamon. Nutmeg, ginger or cloves are not out of place here.
1/2 tsp salt
Combine everything in a mixing bowl and then pour into a greased 8x8 baking dish. Bake at 350 degrees for 40 to 50 minutes or until set and browned to your liking. It really can be eaten anywhere from still a little jiggly to brown and firm so take it out whenever you just can't stand it anymore.
Serve with whipped cream, cold heavy cream, chopped nuts or just a spoon. It's very rich but very tasty.
What do you like to bake up on these cool, rainy, autumn mornings?
Monday, November 8, 2010
Tuesday, June 15, 2010
Care and Feeding of Your Kefir Grains
This is a letter I wrote to a friend when I gave her kefir grains last week. I hope it is useful to you, as well!
*** **** *** **** ***
Congratulations! You are now the steward of an amazing life form, kefir, that will provide you with cultured milk very little work on your part. You are the next a long and unbroken line of stewards that stretches back into the mists of time. Interestingly, no one really knows where kefir comes from or how it first came about. It is believed that the first kefir drinkers came from the mountains of the Caucasus where it is considered a gift from the gods. They may be right because no one has been able to grow kefir in a lab without a starter. Every kefir grain in the world is descended from those original grains.
Kefir grains, as they are called, are not really grains or seeds at all. The spongy “grains” are a colony of yeast and bacteria that convert the sugar in dairy milk into their own spongy outer covering, energy to live and reproduce and a whole host of acids, vitamins and alcoholic byproducts of their metabolism. The grains will grow and reproduce in any dairy milk and like to stay at room temperature so no heating is required. You can also use the grains to ferment other sweet liquids but the grains won’t reproduce. For more information on the microbiological make up of kefir grains, or for any other kind of information you could want about kefir, be sure to check out Dom’s Kefir In-Site.
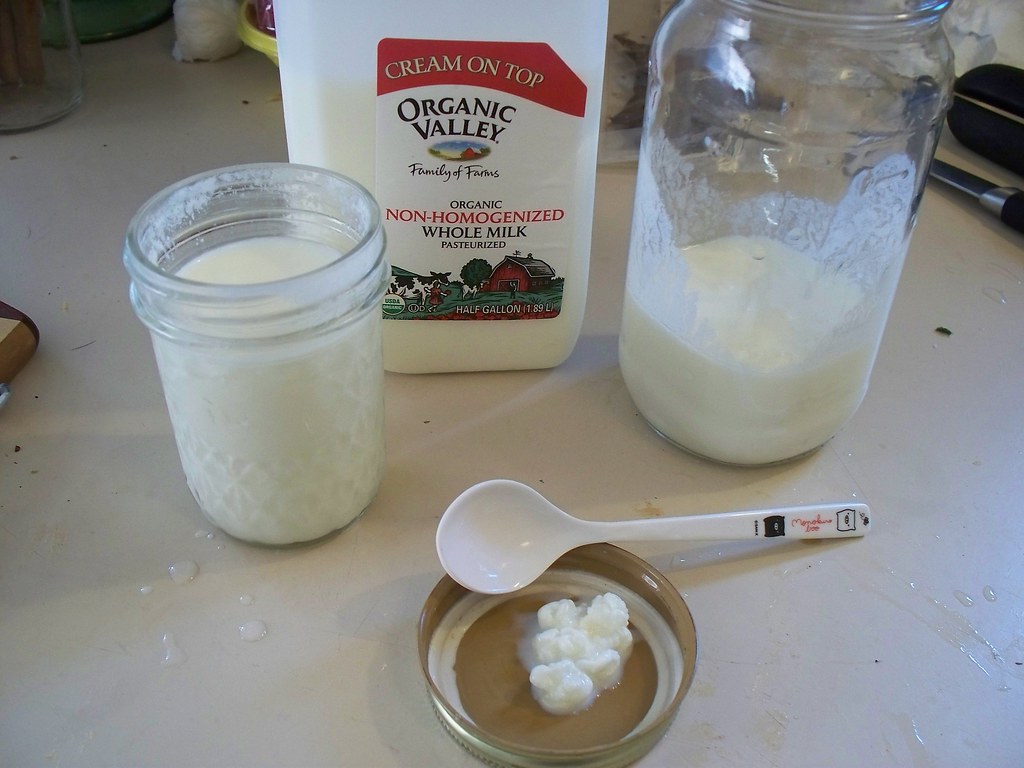
Care and Feeding of Your Kefir Grains
The Very Basics
2 tbs of kefir grains
2 cups of milk
Place the kefir grains and milk in a glass jar with a lid and leave at room temperature until the milk thickens and sours. Strain the kefir, reserving the grains. Add the grains to fresh milk and store the finished kefir in the fridge until you use it.
See, wasn’t that easy?
Beyond the Basics
They also like to stay at a comfortable room temperature, somewhere between 50 and 70 degrees Fahrenheit. That being said, they are resilient buggers and can bounce back from a lot of abuse.
The Milk
Kefir grains are at their happiest in dairy milk that is as close to the way it came out of the animal as possible. They love raw milk but do just fine in pasteurized milk. They do fine in cow or goat milk (or any other type of dairy milk you happen to have) and prefer whole, full fat milk. Low fat milk would be fine, but do not keep them in ultra pasteurized milk (which is actually shelf stable, they just sell it refrigerated because Americans won’t buy shelf stable milk), or non-fat milk for extended periods. If you must buy these types of milk treat them as non-dairy milks, discussed below.
Oh – someday you should try popping your kefir grains into whipping cream. You will never look at sour cream the same way again. Yum!
The Grains and Separating Them
It is suggested to use 1-2 tablespoons of kefir grains to 2 cups of milk and let it ferment at room temperature for 24 hours. You will learn to adjust the amount of milk based on how your kefir grains are doing at culturing milk, the ambient temperature and how many grains you have available. Remember, these guys are hardy and will culture your milk as best they can in a wide variety of circumstances.
You don’t need to rinse your kefir grains (except in special cases as talked about below), just transfer them. They should be clearish white, quite puffy and complex and soft to the touch with a slimy coating. If they are hard, or yellow or smooth they are unhappy and you should check with Dom’s Kefir In-Site to see how to help them, or if they are beyond help.
To separate the grains from the finished kefir you can either strain the kefir through a wire mesh (or plastic, or bamboo) strainer, or fish them out with a spoon or fork. For a long time I fished mine out with a small wooden fork and liked the ease of this method. Any grains I didn’t ‘catch’ just stayed in the kefir and got blended when I made smoothies. I now tend to strain and like that method for two reasons. One, it catches all the tiny baby kefir grains that start to grow in the kefir and two, it helps break up and smooth out the curd of the finished kefir.
Utensils and Jars
I culture my kefir in glass jars with a screw top lid. I tend to ferment mine with the lid on tight because I am afraid of knocking it over and spilling it, but many people suggest leaving the lid slightly ajar, or using a towel or coffee filter over the top of the jar instead of a solid lid. A tight lid allows the kefir to get more fizzy and may alter the amount of alcohol in the finished kefir. Check Dom’s Kefir In-Site for more information about various ways to effect the final fermentation.
It is fine to use stainless steel strainers or utensils to handle kefir, but please make sure they are clean and not left in the kefir for an extended amount of time. Do not use any reactive metals like brass, aluminum, cast iron, or copper. Kefir is acidic and these metals are bad news with acidic food. Plastic or bamboo are other fine choices for handling kefir.
How do I know it’s Ready?
You will know the kefir is ready to strain because the milk will have thickened and smell sour rather than sweet. At first it will be like the consistency of buttermilk, store bought kefir or drinkable yogurt but eventually the kefir will curdle and separate. When this happens you will see a thick layer of white curds floating on top and a thin yellowish liquid below. Taste your kefir at various stages to see which you like to drink – most people prefer it when it has just thickened but I don’t mind curdled kefir, myself.
If the kefir has curdled I make sure the lid is on tight and shake the jar to break up the curds. Then I separate the grains through a strainer and the finished kefir is perfectly good for baking or sweetened smoothies. Remember, kefir is a mix of bacteria and yeast so it will always have a bit more of a yeasty flavor than yogurt or even store bought kefir (which by law is not allowed to have yeast in it). Experiment with more milk or less time if your kefir is too “ripe” or sour for your tastes.

Resting Your Kefir Grains
Your kefir grains will keep fermenting milk into kefir indefinitely as long as they have good milk and proper temperatures. But sometimes you need a break either because you have too much kefir or you won’t be able to strain the grains every day. Luckily, you can refrigerate the kefir grains for up to a couple months with no detriment to the grains.
When you are ready to give your grains a break put them in a clean jar with the same amount of fresh milk that they have been fermenting in a 24 hour period. Dom recommends this amount of milk for resting your grains for up to a week. He suggests increasing the milk by about 30% for each additional week of storage, or you can simply strain the kefir out each week. I have kept 3 tbs of kefir grains in a cup of milk for a couple months at a time and the grains have bounced back just fine. The kefir you strain off the grains after their rest in the fridge is perfectly safe to drink, though it may be thinner or more sour than usual.
Do note that different strains of bacteria and yeast respond to cold storage differently so kefir grains usually require a little care when coming back to full fermenting strength. They should also get to come out of the fridge and ferment at room temperature for a week or so every couple weeks or months so they don’t get too out of balance.
When bringing kefir grains out of the fridge strain them off the old kefir and put fresh milk over them like normal. I usually use a smaller proportion of milk than usual, and change the milk as soon as it seems sour, even if it is a slightly different consistency than usual. The kefir should come back to what you expect it to be within one or two cycles with fresh milk.
Culturing Non-Dairy Beverages
Kefir grains need dairy milk to grow and reproduce but they will culture any liquid into a probiotic beverage. There are two ways to culture non-dairy beverages – switching the grains back and forth, or sacrificing some of the grains to the non dairy beverage.
If you are going to make non dairy kefir only occasionally it is best to switch the grains back and forth. I occasionally make coconut milk kefir by plunking the strained grains into canned coconut milk and let that ferment for 12 or 24 hours. When the coconut kefir is ready strain out the grains and put them back in dairy milk. I often rinse my grains before putting them back in the dairy milk thinking that the surface of the grains needs to be in good contact with the dairy milk. Dom cautions against rinsing in most situations, and I am careful when rinsing to not contaminate the grains.
If you want to continuously ferment non-dairy kefir you should hold back a portion of the grains in dairy milk and use another portion for the non-dairy milk. Use the grains in soy, almond or coconut milk the way you would in dairy milk just being sure to note when they are no longer healthy looking or fermenting properly. Keep another portion in dairy milk so that it keeps growing and you have some to replenish your non-dairy grains when they no longer ferment properly. I’ve never done this method myself, but have heard of others doing it with great success.
You can also play around with fermenting juice or sugar water as well. It often goes alcoholic, but sometimes turns out very tasty.
What To Do With All Your Kefir

Kefir is great in smoothies and baked goods and in a million other dishes. It can basically be used anywhere you would use buttermilk, but it does have a bit of a yeasty flavor that can be unwelcome in some dishes. In other dishes you’d never know the milk was cultured. Here are my favorite ways to use kefir.
*Smoothies. Combine the kefir with frozen or fresh fruit, juice, ice, and sweetner of your choice in a blender to make a delicious smoothie. Add coconut oil, nut butter or good quality egg yolks to boost the protein and fat content, or use more juice to make it lighter. You can blend the kefir with a little fruit syrup or pulp to make it more like the flavored kefir at the store. Experiment with green smoothies!
*Blender Batter Pancakes. This is a method for making pancake or waffle batter by soaking whole grains in kefir overnight and then grinding in your blender. Here is Sue Gregg's original recipe, and here is my blog post on the recipe.
*Kefir naan or flatbread. This is a neat recipe where you combine kefir and wheat flour, knead it like regular bread dough, then let it raise overnight. The natural yeast in the kefir is all the leavening you need. It is a very sour dough but tender and delicious. Cook like naan or pita on a griddle, use as a pizza crust or bake as rolls. Here's the link to the website, and here's a photo and write up of the time I did it.
*Macaroni and cheese. Just use kefir instead of milk for boxed or real cheese sauce.
*Clafouti. This is a delicious, rustic French dessert (or decadent breakfast) that is essentially an eggy pudding studded with fruit. Here's the recipe I use. I just substitute kefir for the milk and use whatever fresh or frozen fruit you have.
*** **** *** **** ***
Congratulations! You are now the steward of an amazing life form, kefir, that will provide you with cultured milk very little work on your part. You are the next a long and unbroken line of stewards that stretches back into the mists of time. Interestingly, no one really knows where kefir comes from or how it first came about. It is believed that the first kefir drinkers came from the mountains of the Caucasus where it is considered a gift from the gods. They may be right because no one has been able to grow kefir in a lab without a starter. Every kefir grain in the world is descended from those original grains.
Kefir grains, as they are called, are not really grains or seeds at all. The spongy “grains” are a colony of yeast and bacteria that convert the sugar in dairy milk into their own spongy outer covering, energy to live and reproduce and a whole host of acids, vitamins and alcoholic byproducts of their metabolism. The grains will grow and reproduce in any dairy milk and like to stay at room temperature so no heating is required. You can also use the grains to ferment other sweet liquids but the grains won’t reproduce. For more information on the microbiological make up of kefir grains, or for any other kind of information you could want about kefir, be sure to check out Dom’s Kefir In-Site.
Care and Feeding of Your Kefir Grains
The Very Basics
2 tbs of kefir grains
2 cups of milk
Place the kefir grains and milk in a glass jar with a lid and leave at room temperature until the milk thickens and sours. Strain the kefir, reserving the grains. Add the grains to fresh milk and store the finished kefir in the fridge until you use it.
See, wasn’t that easy?
Beyond the Basics
They also like to stay at a comfortable room temperature, somewhere between 50 and 70 degrees Fahrenheit. That being said, they are resilient buggers and can bounce back from a lot of abuse.
The Milk
Kefir grains are at their happiest in dairy milk that is as close to the way it came out of the animal as possible. They love raw milk but do just fine in pasteurized milk. They do fine in cow or goat milk (or any other type of dairy milk you happen to have) and prefer whole, full fat milk. Low fat milk would be fine, but do not keep them in ultra pasteurized milk (which is actually shelf stable, they just sell it refrigerated because Americans won’t buy shelf stable milk), or non-fat milk for extended periods. If you must buy these types of milk treat them as non-dairy milks, discussed below.
Oh – someday you should try popping your kefir grains into whipping cream. You will never look at sour cream the same way again. Yum!
The Grains and Separating Them
It is suggested to use 1-2 tablespoons of kefir grains to 2 cups of milk and let it ferment at room temperature for 24 hours. You will learn to adjust the amount of milk based on how your kefir grains are doing at culturing milk, the ambient temperature and how many grains you have available. Remember, these guys are hardy and will culture your milk as best they can in a wide variety of circumstances.
You don’t need to rinse your kefir grains (except in special cases as talked about below), just transfer them. They should be clearish white, quite puffy and complex and soft to the touch with a slimy coating. If they are hard, or yellow or smooth they are unhappy and you should check with Dom’s Kefir In-Site to see how to help them, or if they are beyond help.
To separate the grains from the finished kefir you can either strain the kefir through a wire mesh (or plastic, or bamboo) strainer, or fish them out with a spoon or fork. For a long time I fished mine out with a small wooden fork and liked the ease of this method. Any grains I didn’t ‘catch’ just stayed in the kefir and got blended when I made smoothies. I now tend to strain and like that method for two reasons. One, it catches all the tiny baby kefir grains that start to grow in the kefir and two, it helps break up and smooth out the curd of the finished kefir.
Utensils and Jars
I culture my kefir in glass jars with a screw top lid. I tend to ferment mine with the lid on tight because I am afraid of knocking it over and spilling it, but many people suggest leaving the lid slightly ajar, or using a towel or coffee filter over the top of the jar instead of a solid lid. A tight lid allows the kefir to get more fizzy and may alter the amount of alcohol in the finished kefir. Check Dom’s Kefir In-Site for more information about various ways to effect the final fermentation.
It is fine to use stainless steel strainers or utensils to handle kefir, but please make sure they are clean and not left in the kefir for an extended amount of time. Do not use any reactive metals like brass, aluminum, cast iron, or copper. Kefir is acidic and these metals are bad news with acidic food. Plastic or bamboo are other fine choices for handling kefir.
How do I know it’s Ready?
You will know the kefir is ready to strain because the milk will have thickened and smell sour rather than sweet. At first it will be like the consistency of buttermilk, store bought kefir or drinkable yogurt but eventually the kefir will curdle and separate. When this happens you will see a thick layer of white curds floating on top and a thin yellowish liquid below. Taste your kefir at various stages to see which you like to drink – most people prefer it when it has just thickened but I don’t mind curdled kefir, myself.
If the kefir has curdled I make sure the lid is on tight and shake the jar to break up the curds. Then I separate the grains through a strainer and the finished kefir is perfectly good for baking or sweetened smoothies. Remember, kefir is a mix of bacteria and yeast so it will always have a bit more of a yeasty flavor than yogurt or even store bought kefir (which by law is not allowed to have yeast in it). Experiment with more milk or less time if your kefir is too “ripe” or sour for your tastes.
Photo by David Niergarth.
Resting Your Kefir Grains
Your kefir grains will keep fermenting milk into kefir indefinitely as long as they have good milk and proper temperatures. But sometimes you need a break either because you have too much kefir or you won’t be able to strain the grains every day. Luckily, you can refrigerate the kefir grains for up to a couple months with no detriment to the grains.
When you are ready to give your grains a break put them in a clean jar with the same amount of fresh milk that they have been fermenting in a 24 hour period. Dom recommends this amount of milk for resting your grains for up to a week. He suggests increasing the milk by about 30% for each additional week of storage, or you can simply strain the kefir out each week. I have kept 3 tbs of kefir grains in a cup of milk for a couple months at a time and the grains have bounced back just fine. The kefir you strain off the grains after their rest in the fridge is perfectly safe to drink, though it may be thinner or more sour than usual.
Do note that different strains of bacteria and yeast respond to cold storage differently so kefir grains usually require a little care when coming back to full fermenting strength. They should also get to come out of the fridge and ferment at room temperature for a week or so every couple weeks or months so they don’t get too out of balance.
When bringing kefir grains out of the fridge strain them off the old kefir and put fresh milk over them like normal. I usually use a smaller proportion of milk than usual, and change the milk as soon as it seems sour, even if it is a slightly different consistency than usual. The kefir should come back to what you expect it to be within one or two cycles with fresh milk.
Culturing Non-Dairy Beverages
Kefir grains need dairy milk to grow and reproduce but they will culture any liquid into a probiotic beverage. There are two ways to culture non-dairy beverages – switching the grains back and forth, or sacrificing some of the grains to the non dairy beverage.
If you are going to make non dairy kefir only occasionally it is best to switch the grains back and forth. I occasionally make coconut milk kefir by plunking the strained grains into canned coconut milk and let that ferment for 12 or 24 hours. When the coconut kefir is ready strain out the grains and put them back in dairy milk. I often rinse my grains before putting them back in the dairy milk thinking that the surface of the grains needs to be in good contact with the dairy milk. Dom cautions against rinsing in most situations, and I am careful when rinsing to not contaminate the grains.
If you want to continuously ferment non-dairy kefir you should hold back a portion of the grains in dairy milk and use another portion for the non-dairy milk. Use the grains in soy, almond or coconut milk the way you would in dairy milk just being sure to note when they are no longer healthy looking or fermenting properly. Keep another portion in dairy milk so that it keeps growing and you have some to replenish your non-dairy grains when they no longer ferment properly. I’ve never done this method myself, but have heard of others doing it with great success.
You can also play around with fermenting juice or sugar water as well. It often goes alcoholic, but sometimes turns out very tasty.
What To Do With All Your Kefir
Kefir is great in smoothies and baked goods and in a million other dishes. It can basically be used anywhere you would use buttermilk, but it does have a bit of a yeasty flavor that can be unwelcome in some dishes. In other dishes you’d never know the milk was cultured. Here are my favorite ways to use kefir.
*Smoothies. Combine the kefir with frozen or fresh fruit, juice, ice, and sweetner of your choice in a blender to make a delicious smoothie. Add coconut oil, nut butter or good quality egg yolks to boost the protein and fat content, or use more juice to make it lighter. You can blend the kefir with a little fruit syrup or pulp to make it more like the flavored kefir at the store. Experiment with green smoothies!
*Blender Batter Pancakes. This is a method for making pancake or waffle batter by soaking whole grains in kefir overnight and then grinding in your blender. Here is Sue Gregg's original recipe, and here is my blog post on the recipe.
*Kefir naan or flatbread. This is a neat recipe where you combine kefir and wheat flour, knead it like regular bread dough, then let it raise overnight. The natural yeast in the kefir is all the leavening you need. It is a very sour dough but tender and delicious. Cook like naan or pita on a griddle, use as a pizza crust or bake as rolls. Here's the link to the website, and here's a photo and write up of the time I did it.
*Macaroni and cheese. Just use kefir instead of milk for boxed or real cheese sauce.
*Clafouti. This is a delicious, rustic French dessert (or decadent breakfast) that is essentially an eggy pudding studded with fruit. Here's the recipe I use. I just substitute kefir for the milk and use whatever fresh or frozen fruit you have.
This post is a part of Real Food Wednesdays. Check out more real food blogs at the carnival!
Wednesday, May 5, 2010
Kimchi
I just broke into my latest fermentation experiment, a fantastic kimchi with lots of goodies, including arame seaweed. Kimchi is a fermented cabbage condiment that originates in Korea but is similar to sauerkraut. The main difference is seasoning - kimchi most traditionally is seasoned with ground red pepper, onion, garlic and ginger in addition to the salt. It can include any number of additions or substitutions including cucumber, carrots, different types of onions, root vegetables like radishes, fruits like apples or raisins or even stranger things like shrimp paste or raw shellfish. Koreans have hundreds of variations and these photos by eryoni taken in South Korea show just some of the diversity of Korean pickled vegetables.
This batch I made included the exotic addition of arame, a type of seaweed. Seaweed is a great thing to add to anyone's diet for the trace minerals and rare proteins and sugars. Arame, the common name for the kelp Eisenia bicyclis, is a rich source of calcium, zinc and iodine. It is also a good source of lignans which help fight cancer according to some studies. As expected, its taste is hardly noticeable in the highly flavored kimchi, though it is visually apparent as black threads in the cabbage mix.
Kimchi with Arame
Green/white cabbage
Carrots
Green Onions, or sliced white onions
Arame
Ginger
Garlic
Ground chiles
Sea Salt
Note on amounts: I don't give any. That's not the important part. To make one quart of kimchi I filled up a 3 or 4 quart mixing bowl with shredded veggies and seasonings. I would expect this is about 3/4 of a medium head of cabbage, 2 good sized carrots, 10 big green onions, a handful of arame, 3 inches of ginger, 5 cloves of garlic and enough chiles to make it red and spicy. Enough salt to make it "too salty to be tasty, not salty enough to be gross". See my blog posts on making sauerkraut, making pickles and my pickle FAQ for more information on my methods.
I used a mix of ground whole dried peppers and commercial New Mexico chile powder. In the past I have used a mix of chile flakes (like for pizza), cayenne, New Mexico Chile powder and paprika. You should use however much of whatever you have. This is artisanal cooking!
Shred the cabbage to your liking and either chop, plank or ribbon the carrots with a vegetable peeler. Chop up the green onions however you see fit and mince the ginger and garlic into matchsticks or tiny specks, as you see fit.
Put the handful of dried arame into a bowl of warm water and let sit for 5 or 10 minutes.
Toss all of the veggies together with the ground chiles and salt in a large mixing bowl or cooking pot, tasting as you mix. Pull the arame out of the water, squeezing it as dry as you can and leaving all the grit behind in the bowl. Mix that into the veggies and continue mixing, tasting and adding salt or chile powder as necessary.When the veggies and seasonings are mixed together well and good and salty you can either leave it in the bowl for an hour or so, or start packing it right away. I have gotten lazy and been leaving it in the bowl for a while to allow more liquid to come out of the veggies and make packing it easier.
When you are ready start spooning the mixture into your clean quart sized jar. Really pack it down in there. I use a regular mouth half pint jar to push it down into a wide mouth quart jar, but I've also used wooden meat mallets and those Chinese soup spoons to pack the veggies down. You really want to squeeze all the air out of the jar and let the liquid come up over the veggies. If you are squeezing and squeezing and still not getting liquid over, or at least to the top of your veggies you can add some more brine - salt added to water until it is too salty to be tasty but not so salty it makes you gag. You will end up with a wetter kimchi, but it will ferment just the same.
Put the lid on your well packed veggies and leave them on the counter for a couple days. I find that ferments with ginger in them seem to get fermenting much more quickly. I did this kimchi a day after doing a plain cabbage kraut but the kimchi was ready to go in the fridge a day earlier. It was fizzy and the lid was popping and it was smelling quite sour. Put it in the fridge and start eating it whenever you want something spicy gingery sour salty.
I have been eating this kimchi with everything. My favorite is kimchi and macaroni and cheese, but I was also really impressed with kimchi and colcannon - mashed potatoes with sauteed cabbage and collard greens. It's of course great with any stir fried vegetables or Asian flavored meats, and I tossed a fair amount into a bowl of instant rice noodle soup the other night. I think the trick to incorporating fermented vegetables into your diet is just putting a spoonful on your plate with every meal. No matter what the food you are eating is, try it with some sauerkraut, pickles or kimchi. Maybe you won't like it and you don't eat that spoonful. Then again, maybe you will love it and have discovered a whole new taste sensation. And isn't that what life is all about?
Oh - while you are thinking about kimchi you should check out the Ultimate Kimchi Recipe. The listed ingredients may or may not be the actual ultimate kimchi but the directions certainly do. Enjoy.
This post is a part of Real Food Wednesday, check out everyone else's real food posts!
This batch I made included the exotic addition of arame, a type of seaweed. Seaweed is a great thing to add to anyone's diet for the trace minerals and rare proteins and sugars. Arame, the common name for the kelp Eisenia bicyclis, is a rich source of calcium, zinc and iodine. It is also a good source of lignans which help fight cancer according to some studies.
As expected, its taste is hardly noticeable in the highly flavored kimchi, though it is visually apparent as black threads in the cabbage mix.Kimchi with Arame
Green/white cabbage
Carrots
Green Onions, or sliced white onions
Arame
Ginger
Garlic
Ground chiles
Sea Salt
Note on amounts: I don't give any. That's not the important part. To make one quart of kimchi I filled up a 3 or 4 quart mixing bowl with shredded veggies and seasonings. I would expect this is about 3/4 of a medium head of cabbage, 2 good sized carrots, 10 big green onions, a handful of arame, 3 inches of ginger, 5 cloves of garlic and enough chiles to make it red and spicy. Enough salt to make it "too salty to be tasty, not salty enough to be gross". See my blog posts on making sauerkraut, making pickles and my pickle FAQ for more information on my methods.
I used a mix of ground whole dried peppers and commercial New Mexico chile powder. In the past I have used a mix of chile flakes (like for pizza), cayenne, New Mexico Chile powder and paprika. You should use however much of whatever you have. This is artisanal cooking!
Shred the cabbage to your liking and either chop, plank or ribbon the carrots with a vegetable peeler. Chop up the green onions however you see fit and mince the ginger and garlic into matchsticks or tiny specks, as you see fit.
Put the handful of dried arame into a bowl of warm water and let sit for 5 or 10 minutes.
Toss all of the veggies together with the ground chiles and salt in a large mixing bowl or cooking pot, tasting as you mix. Pull the arame out of the water, squeezing it as dry as you can and leaving all the grit behind in the bowl. Mix that into the veggies and continue mixing, tasting and adding salt or chile powder as necessary.When the veggies and seasonings are mixed together well and good and salty you can either leave it in the bowl for an hour or so, or start packing it right away. I have gotten lazy and been leaving it in the bowl for a while to allow more liquid to come out of the veggies and make packing it easier.
When you are ready start spooning the mixture into your clean quart sized jar. Really pack it down in there. I use a regular mouth half pint jar to push it down into a wide mouth quart jar, but I've also used wooden meat mallets and those Chinese soup spoons to pack the veggies down. You really want to squeeze all the air out of the jar and let the liquid come up over the veggies. If you are squeezing and squeezing and still not getting liquid over, or at least to the top of your
veggies you can add some more brine - salt added to water until it is too salty to be tasty but not so salty it makes you gag. You will end up with a wetter kimchi, but it will ferment just the same.Put the lid on your well packed veggies and leave them on the counter for a couple days. I find that ferments with ginger in them seem to get fermenting much more quickly. I did this kimchi a day after doing a plain cabbage kraut but the kimchi was ready to go in the fridge a day earlier. It was fizzy and the lid was popping and it was smelling quite sour. Put it in the fridge and start eating it whenever you want something spicy gingery sour salty.
I have been eating this kimchi with everything. My favorite is kimchi and macaroni and cheese, but I was also really impressed with kimchi and colcannon - mashed potatoes with sauteed cabbage and collard greens. It's of course great with any stir fried vegetables or Asian flavored meats, and I tossed a fair amount into a bowl of instant rice noodle soup the other night. I think the trick to incorporating fermented vegetables into your diet is just putting a spoonful on your plate with every meal. No matter what the food you are eating is, try it with some sauerkraut, pickles or kimchi. Maybe you won't like it and you don't eat that spoonful. Then again, maybe you will love it and have discovered a whole new taste sensation. And isn't that what life is all about?
Oh - while you are thinking about kimchi you should check out the Ultimate Kimchi Recipe. The listed ingredients may or may not be the actual ultimate kimchi but the directions certainly do. Enjoy.
This post is a part of Real Food Wednesday, check out everyone else's real food posts!
Thursday, February 11, 2010
I Love Oregon.. and Cheese
February 14 is not only that hallmark holiday all decked out in pink and red, it is also the anniversary of Oregon becoming a state. Since I love Oregon much more than I love pink hearts I am very happy that a friend of mine has a tradition of a "Oregon, Be My Valentine" cheese and wine party each year. We play Pin the Heart on Oregon, take prom-style photos in front of a giant map of Oregon, wear green instead of red and generally love up on our very lovable state. Oh, and eat a ton of local (and otherwise) cheese and wine. Oregon is known for both.
Pin the Heart on Oregon, take prom-style photos in front of a giant map of Oregon, wear green instead of red and generally love up on our very lovable state. Oh, and eat a ton of local (and otherwise) cheese and wine. Oregon is known for both. For two years running I have made cheese logs. Not only are they retro and delicious, they're a great way to stretch a little high quality cheese out to feed a party. One recipe I've made is the classic cheddar cheese log and then I made two others with blue cheese and goat cheese. Here's the cheddar recipe, with variations for the other two below it.
*** *** ***
Cheddar Cheese Log for the 21st Century
8 oz cream cheese or homemade yogurt cheese (see below)
6 oz shredded cheddar cheese (see below for links to directions to make it, or buy the best quality you can find. The sharper the better)
1/2 tsp Worcestershire sauce (look for High Fructose Corn Syrup free brands)
1/2 tsp ground mustard
1 tsp seasoned salt (like Chile Grill Salt)
1/4 tsp ground black pepper (optional)
1/4 tsp cayenne pepper (to taste, optional)
1/4 tsp turmeric, if your seasoned salt doesn't have it in it
1/3 cup finely chopped almonds, walnut or other nut of your choice
*Combine the cream cheese and shredded cheddar in a bowl with a fork, or with a mixer. Sprinkle the seasonings in and continue mixing until everything is uniformly combined.
*Use plastic wrap and your hands to form the cheese mixture into a ball, log or several small balls. Wrap in plastic wrap or parchment paper and refrigerate until firm, at least two hours.
*Unwrap the cheese and roll it in the finely chopped nuts. Serve with crackers or sliced apple.
Herbed Goat Cheese Log
-8 oz cream cheese or yogurt cheese
-6 oz soft goat cheese, with or without herbs
-Up to 2 tsp of two or three of your favorite dried herbs or a tablespoon or so of your favorite fresh herbs chopped finely. Try oregano and thyme or basil and rosemary or herbs de Provence.
-Salt and pepper to taste
-1/3 cup chopped pine nuts, hazelnuts or other nuts
-1 tbs ground sumac
*Combine cream cheese, goat cheese and herbs in a bowl or mixer. Use plastic wrap to form into a ball or log and refrigerate until set.
*Roll firm cheese log in either the nuts or the sumac, or a mixture of both. Serve with pita bread or sliced pears.
Honeyed Blue Cheese Log
8 oz cream cheese or yogurt cheese
6 oz soft blue cheese
salt and black pepper
1/3 cup chopped pecans
2 tbs dark honey
*Combine the cream cheese and blue cheese with a fork or mixer, adding salt and a little black pepper as you would like. Form, wrap and refrigerate.
*Unwrap the cheese and sprinkle liberally with black pepper. Roll in the chopped pecans and place on your serving platter. Drizzle the honey over the cheese and serve with sweet, crisp apples.
*** *** ***
Cheese is a healthy food when you choose the right kinds. Those right kinds, as Kristen the Food Renegade reminds us, are made from whole milk from healthy animals and not much else. Anything that says "cheese product" or "protein concentrate" anywhere on the package is not the kind of cheese worth putting in your body. Find a good grocery store or cheese store and start tasting different kinds of real cheese. Better yet, find a farmer who will sell you their homemade cheese or learn to make your own.
Making cheese is not terribly difficult but does take some time. I've never made hard cheese but drool over the directions on Dr. Fankhauser's cheese page regularly. I have, however, made cream cheese out of yogurt many times. Kelly the Kitchen Kop wrote up some great directions here, which is really handy since cream cheese is an integral p art of making cheese logs.
art of making cheese logs. These cheese logs were a huge hit at our party, and I bet they will be at yours as well. The cheddar log has a comforting, familiar taste while the goat cheese one is a little sophisticated without breaking your budget. Everyone raved over the blue cheese log this year. I think it's a particularly inspired flavor combination. I hope you enjoy them as much as we did!
This post is a part of Real Food Wednesday! Check out this week's Mr. Linky for tons more great real food recipes.
Tuesday, January 19, 2010
How to Dress a Salad
When people are switching over to a more traditional or healthful diet the how-to of salad dressing almost always comes up. Commerical salad dressing is usually a nasty brew of polyunsaturated oils, high fructose corn syrup, artificial flavors, gums and starches. For some people switching to a healthier diet they are the first thing to get tossed out of the fridge. For others they can be the last. Healthy, homemade salad dressing SHOULD be easy, ri ght? It's just oil, vinegar and seasonigns, what can be so hard? I can hear the healthfood wanna be's laughing now.
3 tbs high oleic sunflower oil or un-toasted sesame oil
Combine everything but the oil in a small jar with a lid. Stir to combine and then add the oil. Screw on the lid, shake to combine then taste and adjust as necessary.
Fruity Vinaigrette
1 tbs extra virgin olive oil
Combine everything but the oil in a small jar with a lid and stir well to combine, getting the honey really incorporated into the vinegar. Add the oil, put the lid on, shake to combine and adjust seasoning.
Balsamic Roasted Garlic Dressing
3 tbs olive oil
Mash the roasted garlic with the mustard and the salt and pepper. Stir in the vinegar until it is well combined then shake it up with the oil.
What is your favorite salad dressing? What is your favorite salad recipe? Have you suceeded in copy catting a favorite commercial dressing? Who do you buy your olive oil from?
This post is a part of Real Food Wednesday. Check it out for more real food recipes and stories!
ght? It's just oil, vinegar and seasonigns, what can be so hard? I can hear the healthfood wanna be's laughing now. I had the hardest time with salad dressing until just recently. It was always too oily, or too vinegary, or too salty, or not salty enough. Then I discovered an old cookbook, snitched from a public library untold years ago, in my mom's basement. The Savory Way, by Deborah Madison, one of the leaders of the Berkeley health food movement in the 1960s and 70s. The book is vegetarian and elegant, but homely too. These are the kinds of foods someone who has spent years perfecting their sense of flavors and textures makes at the end of a cocktail party, or for her own Sunday afternoon supper. Flipping through the book makes me long to live next door to her, to have the luxury of dropping in for a bowl of this or a nibble of that. Generally simple, but perfectly composed, her salads are a highlight of the book.
In one of the salad dressing recipes she mentioned her trick to perfect sald dressings - a simple ratio. She uses a ratio of 3:2, oil to acid for all of her dressings with adjustments in ingredients and additions, but not that base ratio. Three to two is almost identical to 5:3 but using that ratio allows you to mix and match your oils and acids in even more variations. A ratio also allows you to make various quantities ranging from a quarter cup of dressing for dinner for two to a quart of dressing to keep in the fridge to have on hand. Simply adjust your measuring tool. I often use tablespoons or teaspoons when making dressing for one or two, but quarter cups would make a family sized batch.
A few words about ingredients before I get into some recipes. One of the reasons we are ditching the commercial salad dressings (aside from cost - they are expensive compared to homemade!) is the polyunsaturated fats. In my post on fats I linked to a couple of articles about the health impacts of polyunsaturated fats - as in, they are really bad for you and you should work towards eliminating them completely - and also talked about the cooking fats I do use in my house. Most healthy fats are solid at room temperature, though, making them unsuitable for salad dresssings.
Olive oil is the classic choice for salad dressings. It is high in monounsaturated fat, a fat that has real health benefits, and low in polyunsaturated fats. Use caution when buying and storing olive oil, though, many olive oils are adulterated with cheaper vegetable oils, and the monounsaturated fatty acids are fragile and thus go rancid more quickly than animal fats. Buy from a reputable source and keep the oil in a cool, dark place.
Sometimes you just don't want your salad to taste like olive oil, though. Sometimes you are going for an asian flavor, or your kids balk at the olivey flavor. Check with your olive oil source and see if they have a light or second pressing oil with a more neutral flavor. You can also use some nut or seed oils (sunflower, sesame, walnut, almond, etc) for salad dressing as well. High oleic sunflower oil is a particularly good choice because it is high in monounsaturated fat and low in polyunsaturated, but it is hard to find. When buying nut or seed oils be sure to read the labels  carefully for the levels of polyunsaturated, monounsaturated and saturated fats in the oil. Ideally, you want something with low poly- and higher mono- and saturated. In any case, remember that these seed and nut oils are fragile foods that should be used in strict moderation. Buy small bottles, keep them cool and dark, and don't use them for much of anything except salad dressing. Keep cooking with your good, healthy animal fats.
carefully for the levels of polyunsaturated, monounsaturated and saturated fats in the oil. Ideally, you want something with low poly- and higher mono- and saturated. In any case, remember that these seed and nut oils are fragile foods that should be used in strict moderation. Buy small bottles, keep them cool and dark, and don't use them for much of anything except salad dressing. Keep cooking with your good, healthy animal fats. Here is an example of a simple dressing and a few variations using Deborah Madison's magic ratio. I will use tablespoons for all my measurements because I usually make just enough for one or two meals, but feel free to scale up if you are feeding a crowd.
*** *** ***
Simple Italian Dressing
- 3 tbs olive oil
- 2 tbs red wine vinegar
- 1/2 tsp dijon mustard
- 1 small garlic clove, pressed
- goodly pinch of salt and grind of pepper
In a small jar with a lid combine the vinegar, mustard, garlic, salt and pepper. Stir with a fork until well combined. Add the oil, screw on the lid and shake until well incorporated. Taste, on a leaf of lettuce, and adjust salt or vinegar as necessary.
Asian Dressing
3 tbs high oleic sunflower oil or un-toasted sesame oil
1 tbs rice wine vinegar
1 tbs lime juice
1 tsp grated ginger
1/2 tsp grated or pressed garlic
1/2 tsp soy or fish sauce
a few grinds of black pepper
chile flakes, to taste
Combine everything but the oil in a small jar with a lid. Stir to combine and then add the oil. Screw on the lid, shake to combine then taste and adjust as necessary.
Fruity Vinaigrette
1 tbs extra virgin olive oil
2 tbs light olive oil or high oleic sunflower oil
1 tbs fruit infused cider vinegar (raspberry, blueberry, cherry, plum, etc)
1 tbs red wine vinegar
1/2 tsp honey, or to taste
a pinch of garlic powder
a very generous amount of black pepper
salt
Combine everything but the oil in a small jar with a lid and stir well to combine, getting the honey really incorporated into the vinegar. Add the oil, put the lid on, shake to combine and adjust seasoning.
Balsamic Roasted Garlic Dressing
3 tbs olive oil
1 tbs balsamic vinegar
1 tbs white wine vinegar
2 or 3 cloves roasted garlic
1/2 tsp dijon mustard
salt and pepper to taste
Mash the roasted garlic with the mustard and the salt and pepper. Stir in the vinegar until it is well combined then shake it up with the oil.
*** *** ***
The variations here are endless. Add herb, fruit or spice infused vinegars or oils, different fresh or dried herbs, different sweetners or spices. Sometimes I like to u se the brine from my home pickled vegetables. Pickled beets make a particularly beautiful and tasty salad dressing. You can stir in grated parmesan, crumbled feta or blue cheese, yogurt or sour cream. The sky is the limit here.
se the brine from my home pickled vegetables. Pickled beets make a particularly beautiful and tasty salad dressing. You can stir in grated parmesan, crumbled feta or blue cheese, yogurt or sour cream. The sky is the limit here.What is your favorite salad dressing? What is your favorite salad recipe? Have you suceeded in copy catting a favorite commercial dressing? Who do you buy your olive oil from?
This post is a part of Real Food Wednesday. Check it out for more real food recipes and stories!
Wednesday, January 13, 2010
Soup Weather
Around here it's been cold. And wet. And dark. Did I mention wet? And cold? The perfect weather for soup! Every culture has a multitude of soups and for a very good reason. Soup is a cost effective way to get nourishing, warming food into lots of people. Warm food is so important in this cold time of the year. Many doctors and parents are coming to realize the health implications of not keeping our bodies, especially our children's bodies, warm. Being chronically cold can affec t growth, attention, and even the course of diseases and infection. And we all know how important keeping those bodies well nourished is.
*** *** ***
 Cajun Soup:
t growth, attention, and even the course of diseases and infection. And we all know how important keeping those bodies well nourished is. "But isn't making homemade soup difficult?" people ask. Not if you do a little prep work, keep certain ingredients on hand, and use a little creativity in your soup making. The key to good homemade soup is good homemade stock or broth. Canned stock or broth is just salty water with artificial flavors. It is not healthful or nourishing. Real stock made from bones and meat trimmings is healthful, nourishing, has fantastic flavor and mouthfeel. It does take prep work, but it's all prep work you can do in advance. For information on how to make bone broth check my blog here, my other blog here, Cheeseslave's blog here, or Kelly the Kitchen Kop's blog here. A tasty and relatively healthful vegetarian broth can be created with dried mushrooms or a well chosen assortment of vegetable peelings gently cooked, but check out Cheeseslave and Kelly's blogs for a hundred and one reasons to make bone broth.
Once you've got your bone broth a soup is as simple as sauteeing onions, adding meat and vegetables and adjusting the seasonings. Here is a basic stovetop "chicken" soup recipe with variations.
*** ***
Chicken Soup with Variations
*1 yellow onion, chopped into 1/4 inch pieces
*3 ribs of celery, sliced fine
*2 medium carrots, chopped fine
*Coconut oil or other healthy cooking fat
*1-4 cloves of garlic, pressed or sliced
*1/4 tsp ground sage
*1 tsp oregano
*1 tsp ground, dried rosemary
*salt and pepper to taste (really depends on how salty your broth is)
*2 quarts chicken broth or diluted chicken broth
*1-2 cups assorted chopped or frozen vegetables - green beans, zucchini, peas, corn, potatoes, sweet potatoes, etc.
*1-2 cups raw or cooked chicken meat
*1-2 tbs apple cider vinegar
Heat the cooking fat in a 4 quart soup pot and add the onion, celery and carrot. Salt and pepper lightly and stir over medium heat until the vegetables start to soften. Add the dried herbs and continue to cook, stirring occasionally until the onions are translucent. Add the garlic and cook, stirring constantly until fragrant, about 30 seconds.
Add the broth to the pan, scraping up any browned bits and turn the heat to high or medium high. Add the vegetables and meat and let soup come to a boil. Turn heat to low and let simmer until the vegetables are cooked and everything is hot. Taste soup after it comes to a boil (carefully! burned tongues ruin dinners!) and add salt if necessary.
When the vegetables and meat are cooked through taste the soup again for salt, pepper and acidity. Add a tablespoon of vinegar and see if you like the flavor. Add more if you would like, along with more salt and pepper if necessary.
Allow soup to cool slightly and serve with sauerkraut or other pickled vegetables, buttered or cheesy bread, a salad and a homebrew. Er.. or whatever you would like to serve it with. Hehe.
*** *** ***
Variations on this soup are endless. You can adjust the vegetables, the meat, the broth, the cooking fat, the acid and the seasonings. You can add tomatoes or cream. You can strip the soup down to its most basic. Here are a few of my very favorite variations.
Garlic Soup:
Omit everything except onion (reduce to half an onion, chopped very fine), garlic (increase to 6, 8 or 12 cloves, minced or sliced), cooking fat, broth and vinegar. Serve over a toasted slice of hearty bread, with or without cheese, or with a poached egg in a shallow bowl.
Cajun Soup:Use cajun seasoning instead of the dried herbs (perhaps with some thyme and extra cayenne), omit carrot but increase the celery, and use green beans, peas and sweet potatoes along with chicken or spicy sausage. Serve with sauerkraut and hot pepper sauce.
Taco Soup:
Fry up some ground beef (with organ meat?) with taco seasoning, garlic and onion. Add some tomato, corn and black beans with the chicken broth. Finish with lime juice and serve with sour cream and tortilla chips.
Curry Soup:
Use curry powder instead of the dried herbs, use cauliflower, potatoes and green peas as the vegetables and use lemon or lime juice instead of vinegar. Use virgin coconut oil if you have it.
Bacon and Bean Soup:
Fry bacon first and use bacon grease as your cooking fat. Omit carrots and use drained, cooked pinto or kidney beans instead of the other vegetables. Use the fried, chopped bacon, hot dogs, sausages or no meat and season with a little rapadura, molasses or maple syrup if you'd like. Beef broth is great instead of chicken. Still finish with some vinegar.
Creamy mushroom soup:
Use bacon fat as your cooking fat and add a cup or three of sliced mushrooms in with the onions and celery and cook until the mushrooms have released their water and then gotten dry and browned. Increase garlic if you'd like and use thyme as a main herbal seasoning. Use beef broth if you have it and maybe a splash or wine or brandy. Use red wine vinegar to finish and add sour cream or heavy cream at serving time.
I like to make soup in batches that will provide at least two or three meals at a time because re-heating soup is an easy way to get healthful food on the table fast. You ca n always freshen up or change the flavor of the soup by sauteeing more onions with seasonings before adding the cold soup and heating it up.
n always freshen up or change the flavor of the soup by sauteeing more onions with seasonings before adding the cold soup and heating it up.What kind of soup do you like best? How do you work to keep warm, nourishing food on the table during these cold months? Whats your favorite soup garnish or topping?
This post is a part of Real Food Wednesdays. Check out more real food blogs here!
Huge thanks to These Days in French Life, Oz4Caster, Stubborndev and Greygoosie for their beautiful photos! Click on the photos and surf their flickr streams!
Subscribe to:
Posts (Atom)