Thursday, February 26, 2009

Edible Weeds

Last summer I spent an amazing amount of time learning about plants that produce edible leaves or fruit. I'd always been an animal kid, more interested in dogs and ponies and pigeons than in what was growing in the garden. I was also, however, a food person and as the years have passed I have come to have great respect for the plants that provide me food. Someday I'll have animals that provide me food, but until then I will focus on edible plants. And what easier plants to get food from than the ones you don't have to plant or tend?

I started my journey by learning to identify "garden" plants like raspberries, blackberries, apples, plums and cherries. All of these grow rampant here in Western Oregon and late last summer I collected an abundance of fruit from all of them. From there I started learning about garden weeds, and have started doing some reading on wilder weeds. One of the best resources on weeds, wildcrafting and herbal medicine is Susun Weed. Reading her Ezine and articles have been inspiring and I would love someday to be able to take one of her correspondence classes. There are lots of other great herb blogs, websites, books and classes out there. If you are interested in this then be sure to do you research. There are lots of safe, edible plants to be found out there but plants generally don't want you to eat them. Many have come up with some pretty clever ways to keep you from eating them more than once.

This weekend I went for my first herb walk of the spring. I was out looking to see if the nettles had come up yet and was suprised at how many other little green herbs I found. I can't wait to go back in a few weeks and do some actual harvesting. Everything was too small to harvest this week - you can't harvest little babies! :)

Here's what I found:
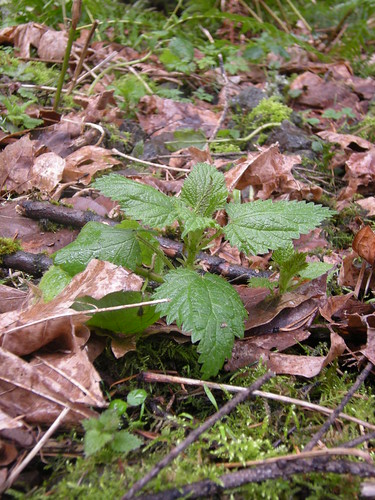
Nettles!

Susun Weed considers nettles (Urtica dioica) to be one of the most nourishing herbs. She recommends making an herbal infusion by letting one cup of dried herb steep in a quart of hot water for at least 8 hours. She says that nettle weed "builds energy, strengthens the adrenals, and is said to restore youthful flexibility to blood vessels. A cup of nettle infusion contains 500 milligrams of calcium plus generous amounts of bone-building magnesium, potassium, silicon, boron, and zinc. It is also an excellent source of vitamins A, D, E, and K." Can't really beat that with a stick. I'm going back for nettles again soon!
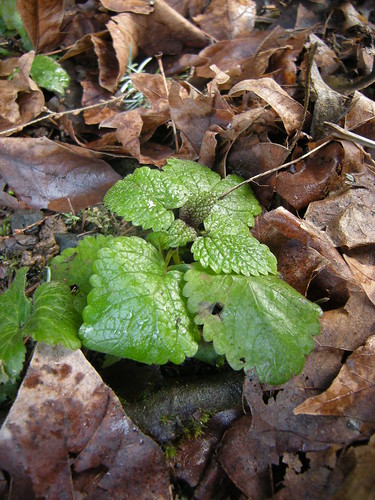
Melissa!

This herb is called either melissa or lemon balm (or Melissa officinalis if you are into that kind of thing) and has one of the most lovely scents in the plant kingdom. It's in the mint family but has a soft, lemony scent that is perfect in iced tea, ice cream or muddled into your julep in the summer. I've got a big bush of this in my parents backyard, but may harvest some next time I'm up on this trail as well.
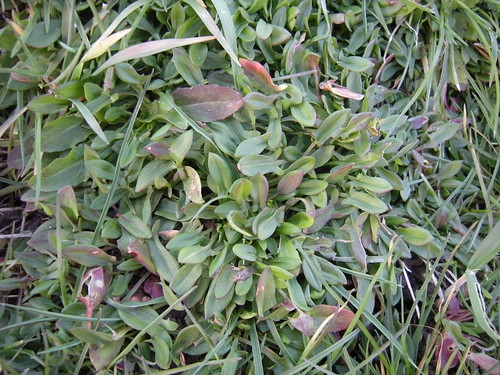


Sheep Sorrel!

I first came across sheep sorrel (Rumex acetosella) as a weed in a garden at the school I worked at. The kids all called it sour grass - a very descriptive name. It grows like a weed (er, is a weed, whatever...) here in Western Oregon and has a lovely lemony tart flavor. I like to munch on it on walks, but it would be a wonderful addition to a salad. Apparently it is also a major constituent of the Essiac formula, which is alleged to have cancer curing properties. Fascinating.


Plantain!

Lanceleaf Plantain (Plantago lanceolata) is a close cousin of common or broad leaf plantain (P. major) and both are alleged to have amazing healing powers. Plantain is edible as a salad herb or a cooked green vegetable and is also supposed to be wonderful for stings, infections or inflamation. I've read more than one account of chewed up plantain leaf stopping the pain and swelling of a bee sting, or of it relieving the itch of poison oak. I look for plantain everywhere I go and remember prime locations. I have a feeling it will be worth it someday.

I also found some chives and a cabbage plant escaped from the a community garden I walked by. I watch the perimeter of that garden all summer for escaped produce :)

Learning to identify edible plants is not hard. Check out plant ID guides at the library and spend some time looking around at what's in your own yard or a park nearby. I'm hoping that wild plants can be a significant addition to my vegetable diet this summer. Why not? They're free for the taking and so full of wonderful wild plant energy and nutrition.

Wednesday, February 18, 2009

My Favorite Coconut Recipe

The Real Food Wednesday topic this week is healthy coconut recipes. When I was a kid I thought I didn't like the taste of coconut, but it turns out that it's actually the texture of coconut flakes that I don't like. Since discovering coconut milk and coconut oil I have come to really love the flavor of coconuts. I use it for lots of things in my kitchen (which I will share with you here) but, as any of you who have read my blog before know, my all time favorite recipe with coconut in it is - yup, you guessed it. Thai Yellow Curry. Today I'll share with you my two home made thai yellow curry recipes. Both are delicious.
For more information on why coconut is so healthful (and it is) check out these links.

The Weston A Price Foundation article on coconut oil.

Bruce Fife's page on coconut - note, he sells coconut products. Not that his research is bad, just that he's got a reason for you to love the stuff.

Kelly the Kitchen Kop's blog on coconut.

Practical Nourishment - a blog I just found and intend to read often!

I always have coconut milk and coconut oil in my kitchen. I use expeller pressed coconut oil from Omega Nutrition anywhere I would use vegetable oil (which I don't use because it is so high in polyunsaturated fats which are not very healthy for you) because it can be heated to medium/high temperatures and doesn't add a coconutty flavor. Here are a few of my other favorite uses for coconut oil and milk.

*Coconut milk kefir. Just drop kefir grains in coconut milk for a sweet, sour, tangy non-dairy fermented treat. Kefir grains will not grow in coconut milk, but they survive just fine as long as they get switched back into dairy milk. SN of Everything Free Eating propogates kefir grains in dairy milk and then uses them in coconut milk until they die to make kefir for her dairy sensitive kids.

* Coconut oil mixed with butter on popcorn. Oooohhhmmmyyyyyyuuuummmmm. Yeah. It's that good.

* Coconut-chocolate bark made with coconut oil, cocoa powder or melted chocolate and chopped nuts. It's candy, and it's good for you, I swear. I've never added butter or peanut butter, but here's a recipe that is worth trying over at Practical Nourishment.

* Jamacian Beans and Rice. A one pot dish adapted from the recipe in Nourishing Traditions. So, so good!

* Sometimes I eat a spoonful of coconut oil off a spoon to tide me over until I can eat real food. It's amazing how well it works at staving off hunger.

And now onto the meat and potatoes, er, coconut milk and chicken. As you can see from my Mission: Yellow Curry PDX entries I love Thai yellow curry. I love how complex it is, and how filling and soothing. It's wonderful for a hang over, not that I know anything about that sort of thing. Amazingly, it's super easy to make at home as well. Remember, a curry is just a stew. Add what you have, subtract what you don't and adjust the amounts or consistency to suit your tastes or the number of folks you are feeding.

You do need one special ingredient to make Thai curry and that is Thai curry paste. Indian curry powder will not do. My favorite brand, and one that a friend who actually lived in Thailand used, is Mae Ploy. I buy it locally at an asian supermarket, but have seen it at other grocery stores in town. You can also get it here on Amazon. Or just google around, maybe some other, slightly less giant/evil corporation will ship it to your house. Mae Ploy makes other flavors of curry paste and all can be substituted for the yellow but the all have slightly different tastes. Yellow curry is the mildest as far as heat goes, so if you have gringo taste buds be careful!

This is the Thai curry that my friend Rosie taught me to make my freshman year of college. It changed my world. Maybe it will change yours as well.

Thai Curry at Home
* 1-2 tbs virgin coconut oil or flavorless cooking fat
* 1/2 -1 yellow onion, sliced or chopped coarsely
* 1-2 cloves garlic, sliced or minced
* minced ginger (I would use about 1 tbs minced, but if thats too much for you,use less)
* chile flakes (optional)
* 3 or 4 tbs Mae Ploy Thai Yellow Curry Paste
* 1 14 oz can coconut milk
* 2 cups water or chicken stock or a mix
* 2 tsp soy sauce
* 1-3 tsp Thai fish sauce
* 2 frozen chicken breasts or equivalent in cooked meat or cubed tofu (I don't recommend it, but that's how I was taught - it's your dinner :)
* approx 2 cups of any of the following, or a mix: yellow, red or purple potato or sweet potato, washed and chopped and/or chopped carrots and/or chopped eggplant or zucchini and/or cauliflower florets, green beans, frozen peas
* Fresh limes for juice
* a spoonful of brown sugar (very optional)

1. Melt fat in a largeish sauce pot (mine is probably 3 quarts.. not quite a soup pot) and add onions (and carrots if using). Rosie taught me to slice the onions longitudinally, and I still like to do it that way for curry. It doesn't really matter though. Cook over medium heat until transluscent. Add ginger and garlic and cook until fragrant (add chile flakes now, but don't unless you know how spicy your curry paste is). Add curry paste to the cooked vegetables and mash, mix and fry until quite fragrant.

2. Add coconut milk and stir to combine paste in with the coconut milk. Add potatoes (sweet potatoes/cauliflower/other hard veggies or eggplant) and chicken (or tofu, or not) to the pot. Add soy sauce, fish sauce and chicken broth and water to barely cover the contents. You can use chicken broth or water. Bring to a boil, lower heat and let simmer until potatoes are tender and chicken is cooked through. Add soft vegetables like green beans, zucchini or frozen peas later in the cooking process so they don't get too mushy.

3. Add a little lime juice to the curry and taste for seasonings. Adding a little bit of brown sugar will mellow the heat a bit. Soy sauce will deepen the flavor. Hot sauce will up the heat. Serve over rice, and enjoy!

I've also made this thai curry recipe from A Year of Crockpotting in my Rival crock pot. I used Mae Ploy curry paste instead of the chili paste it calls for and it was delicious. Here's my write up over at Recipezaar. In any of these recipes you can adjust the amount of hot sauce or chile flakes, curry paste, sugar, soy sauce or fish sauce to your own tastes. I've taken to adding a little bit of turmeric to the sauce too, to counteract the dulling effect of the soy sauce on the color of the curry. Oh, and some places add basil or cilantro to their curry. You might like that.

Coconut milk and oil are amazingly tasty and healthful food products. It is worth perfecting a few recipes to get those healthful products into your repertoire. And pretty soon you'll be sneaking spoonfuls of coconut oil late at night like the rest of us.

P.S. My lunchbox is a Laptop Lunchbox (www.laptoplunches.com). You can see more of my photos by clicking on the photos and viewing my flickr streams.

Friday, February 13, 2009

Mission: Yellow Curry PDX 003

I work in the Lloyd District of Portland and there are a lot of restaurants around here. I am always on the lookout for new or previously missed Thai places as I drive or walk around. A couple weeks ago I spotted a place on Broadway at 14th that I had never seen before and promptly ordered their yellow curry. It was amazing, and today I went back for round two. Chai Yo.

Chai Yo
1411 NE Broadway, Portland OR
They don't have a website but their phone number is 503 287 0500

What I Ordered:
Lunch special yellow curry with chicken, medium spicy.

Overall Curry Rating: 5

Service: 5
The restaurant is in a convereted old house and is beautiful inside. A little more white tablecloth than many Thai places. I called my order in today but last time I ordered and waited. Both times the service was prompt, friendly and accurate.

Presentation/Packaging: 5
The lunch special curry came in a pint sized plastic container with a lid with the rice in a separate to-go container. No leaks or spills or anything. Perfect.
Oh - there was a bit of a red oilslick on top of the curry by the time I got it back to my office to eat. This doesn't bother me, but it might bother some.

Portion Size/Pricing: 4
6.95 for the lunch special. It was a goodly sized meal, but none for leftovers. Well, maybe that COULD have been two meals, but this is curry for pete's sake. I blog about the stuff, I love it. I'm not going to say no :)

Flavor Complexity: 5
This is some of the most interesting and different yellow curry I've had in Portland. It is redder in color than most other restaurants, and part of that may be the spice level. When you say medium, they make it medium not the "you might be able to taste a little spice" medium of most Thai places in Portland. Other than that it has a great saltyness and you can detect fishy flavors every once in a while. Lemongrass pops out occasionally but this cook doesn't lean on the sweet like so many others do. This place is worth going to just for the experience of eating this curry :)

Overall Flavor: 4
As noted, it's a bit spicy. I actually got a little sweaty and lightheaded on the medium spice, so order accordingly. The potatoes and carrots were cooked through, and they gave me plenty of rice.

Anything Else I Ordered: n/a
I didn't get anything else this time, but last time I ordered their special avocado spring rolls. If you've never tasted melty hot avocado in crispy fried won ton skin you are missing out!

Last Thoughts:
Chai Yo has a mighty fine curry. I can't wait to have an excuse to go there sometim and try some of their other dishes. With the care and complexity they bring to their curry I can't help but be excited for their stir fry and noodle dishes!

Thursday, February 12, 2009

Summer, Preserved

This last summer was the first year I made a real effort to preserve local produce for the winter. It's not that I had never wanted to before, I just hadn't had the motivation or shelf space to really go for it. Summer 2008 was a flury of activity - picking, harvesting, canning, drying, packaging and enjoying. All of this in addition to working a 40 hour job, doing the daily cooking and walking the dog. Oh, and seeing friends occasionally and sleeping. By the end of the summer I was tired and felt a real kinship with the falling leaves. I wanted to fall and let myself decompose during the winter after a hard summers work.

Well, it's winter now and decomposing is something I'm doing a lot of. Do you even know how many great movies there are on Netflix? But I do make it up off the couch and into the kitchen occasionally and my favorite meals lately have included the fruits of my summer labor. There is something magical about opening a jar you put up months ago and being transported back to that time and place. I am totally sold on this food preservation thing if for no other reason than the flavor.

But there are, of course, a myriad of other reasons. I have tomatoes in my pantry that I bought for a dollar a pound and canned myself. I spent less money than I would have on organic canned tomatoes AND I know exactly where the 'maters came from. They were not shipped across the country, or handled by unknown, underpaid workers who don't really care about my health and well being. They were handled by the farmer and by me. Only.

I also have a fair amount of wild or "feral" plant life in my pantry. All of my berry preserves and a couple treasured jars of plum sauce came from plants running their own lives in local parks. Sandor Katz talks about wild energy of wild plants and how eating them can infuse that natural, uncultivated wildness into your own life. I've been watching those plum trees for years and ended up with about 15 pounds of plums in one evening of harvesting. I recently discovered the dried plums I made from some of that fruit hiding in the back of my pantry. They are delicious beyond what anyone would expect a prune to be.

Another great joy of preserving food is having the ability to trade or give it away. I went to visit friends in Southern Oregon last weekend and brought with me a selection of jars from my pantry. One family got applesauce and hot pepper jelly, another plum sauce and blackberry jam. I was able to trade my blackberry jam with another friend for her wild blueberry jam. Both are delicious, and it's all the more exciting to spread a bit of the Southern Oregon mountains on my toast, knowing my dear friend's energy is in it as well. I spent no money on Christmas presents this year either, I just gave away jam.

I recently dug some roasted red peppers out of the freezer to add to my February First Red Soup. My boyfriend brought these peppers home from a U-Pick farm in early September when our dealing-with-food energy reserves were getting low. They looked pleasant enough, even if there were vast quantities of them. And then someone cut into one. Holy moly! We started refering to them as the devil horn peppers. Never kiss a man who has been chopping peppers, not even if he swears he didn't eat any. You will get capsaicin on your face and it will be painful. We made hot sauce, red pepper jelly, and hot relish. We dried them and gave them away and still there were more in the box! Finally I threw the last of them in a baking dish with the last of the tomatoes, some olive oil and some garlic and roasted it until they were soft and a bit charred here and there. I put the fiery goo into the freezer and said good riddance.

Here is this years rendition of my traditional red soup that I make every February First. The roasted chiles added a wonderful kick, and I was glad to welcome them back to the table.

February First Red Soup To Warm the Belly and the Soul
2009 Version

*7 cups homemade chicken broth and/or water
*1/2 cup roasted red peppers
*1 cup red lentils
*1/2 onion, diced
*3 cloves of garlic, sliced
*1 tbs cider vinegar or wine
*cooking oil (goose grease, coconut oil, or whatever you like)
*mustard seed (about a tsp), curry powder (maybe 1/2 a tsp), seasoned salt, pepper and turmeric to taste/color

*In a 4 quart pot warm/defrost the chicken broth and roasted peppers. Puree in the blender once liquid, if you choose. Bring to a boil and add the lentils. Taste the liquid for salt and adjust as necessary. Once boiling drop the heat to a simmer and allow to cook until the lentils are disintegrating.
*In a separate pot or sautee pan heat the cooking oil and the mustard seed. After a minute or two add the onions and curry powder, salt and pepper and stir. When the onions are soft add the garlic and sautee another minute or until fragrant. Add some turmeric at this time if you would like.
*Deglaze the onion pan with the vinegar, stir to get all the browned bits up and pour the vegetables into the pot of lentils. Taste and adjust seasoning and simmer another couple minutes to combine the flavors.
*Serve with curried or turmericked sour cream and red bell peppers as garnish.

Have you ever done any food preserving? What is your favorite part of the process? Are you delighting in any out-of-season-from-your-pantry goodies this winter?


Thursday, February 5, 2009

Mission: Yellow Curry PDX Entry 002

Entry two in the log of my goal to eat yellow curry at every Thai restaurant in Portland. This time I went straight for the big guns - my favorite Thai place in SW Portland. It may seem like a long way to drive for some, but it's right around the corner from my house... and it's good. Thai Roses.

Thai Roses Cuisine

6840 SW Beaverton Hillsdale Highway - and yes, that is a Portland address.
http://www.thairosescuisine.com/

What I ordered:
Out to dinner with a friend so we got yellow curry, medium with chicken, pumpkin curry with chicken, spicy eggplant with pork and both steamed and sticky rice.

Overall Curry Rating: 5

Service: 5
Despite having gotten take out there a number of times this was the first time I ever had a sit down meal there. Lovely Thai themed decor and a friendly wait staff. They were out of the special we ordered but the waitress was very helpful and apologetic. Someday I'll have a meal at one of their outdoor tables. They're kind of in the parking lot, but they've put in a lot of plants to make it seem more secluded. No complaints on service.

Presentation/Packaging: 4
They used kind of modern, square bowls and plates to serve the food and everything came with a cute little carrot flower garnish. The sticky rice came in a super cool wicker basket.

Portion Size and Price: 4
8.95 for the dinner sized curry with chicken. I'm OK with that.

Flavor complexity: 4
Sweet and salty and pungent. I love Thai Roses' curry! I didn't like the flavor of the pumpkin curry as much but it did have basil leaves in it reminding me that I like that flavor in yellow curry a lot. I wonder if I would have missed the basil if we didn't have the other curry to compare and contrast.

Overall flavor: 4
It was wonderful. The potatoes were cooked through but not mushy, ditto on the carrots. The onion still had some crunch and onion flavor to it, and we even got bell peppers! I could taste a little fish sauce in the curry, but not overwhelmingly so. Could have been a little spicier, but it was very very good.

Anything else I ordered: 3 and 5
The pumpkin curry was a bit of a disappointment. The "pumpkin" was actually squash and it was a little dry and not terribly flavorful. Even with the basil it wasn't quite as tasty of a curry sauce. The spicy eggplant, on the other hand, was unbelievable. I wanted to lick the sauce off the plate after we had scarfed all the eggplant and pork down. I settled for dabbing balls of sticky rice in it. The eggplant were buttery and soft and the sauce garlicky, basily and soy saucey. They used sliced pork which I like, but I've had it elsewhere with ground pork and I think I like that even better. Either way, spicy eggplant rocks! Oh - and it was hardly spicy. Next time I might order that hot instead of medium.

Last thoughts:
It may be the forgotten SW, but it's worth a drive out there. There's a New Seasons around the corner so you can pretend like you are grouping errands together. Everything I've had from these guys has been great and they are always friendly and sweet. I love Thai Roses!

Wednesday, February 4, 2009

Kraut 101

I've become known in some circles as a bit of a fermentation guru. I'm no Sandor Katz, but I've done a fair amount of pickling and have a pretty decent understanding of the science of fermentation. I have been asked time and time again for help with the basics of making sauerkraut and was disappointed with some of the other kraut recipes out there. I developed this little tutorial to help the beginner kraut maker. I think it's easy, and I know it works. Give it a try.

At it's most basic sauerkraut is cabbage and salt, left to ferment into a tangy condiment. The fermentation is completed by a wide variety of bacteria that turn the sugar in the cabbage into acid that in turn preserves the cabbage from spoilage. The live bacteria in unheated sauerkraut provide immense benefit when eaten including better digestion, increased gut health and an immune system boost. I recently read that the healthy bacteria that live on your skin and in your gut outnumber your body cells 10 to 1 - doesn't it make sense to make sure they are the right kind of bacteria?

Here are my instructions for making one quart of jar fermented sauerkraut. This is a great size to start with because it is big enough for everyone to try it a couple times, but not enough that you feel overwhelmed. After your first batch, make a second and try some variations. I'll list some of those down at the bottom.

Phase one: Shopping
1. Find good quality, organic green or purple head cabbage. Look at the grocery store or at farmers markets. Even non-organic ones will ferment just fine, but buy organic if you can. One 8 inch diameter head will be more than enough, but it's not a bad idea to pick up more than you think you'll need. You can use leftovers in a recipe like this soup from Nourishin Days. Weigh your cabbage at the grocery store and remember this number.
2. Buy good quality sea salt. I use Real Salt and highly recommend it because it is "real" salt with micronutrients, but isn't going to break the bank either.


Phase two: Cleaning and Chopping
1. Get a quart size mason jar with a lid. You can either buy 6 or 12 of them new with lids, or find one at a thrift store and buy new lids and rings at the grocery store. You might even have some at home already. Wash it well with soap and hot water.
2. Core and chop your cabbage. Commercial kraut is often made with really finely shredded cabbage. I prefer a little bigger shreds.. more or less as small as I can get them with a knife.
3. As you chop your cabbage stuff it into the jar.. with no salt.. this is just for measuring. Don't pound it in, just stuff it as stuffed as you can get it. When the jar is full pull the cabbage out into the biggest mixing bowl (or a big cooking pot) you have. Add another handful or two of shredded cabbage.

Phase three: Salting and Packing
1. Remember how much your head of cabbage weighed at the grocery store? Do a little mental math estimating how much of the cabbage you used, and multiply that by 2 tsp per pound. For example, your cabbage weighed 2 pounds and you used 3/4 of the head. You used 1 1/2 pounds of cabbage so you need 3 tsp of salt. Figure out how much salt you need and sprinkle that over the cabbage. No need for a calculator here, just guestimate.
2. Toss the cabbage and the salt with your hands, squeezing and crunching the cabbage. You should start to see some liquid coming out of the cabbage. Keep kneading and squeezing, thinking about how yummy and healthy this kraut is going to be and how much you love your family for a couple minutes. Alternatively, you could pound the kraut with a wooden pounder or meat tenderizer for a shorter period of time like Jungleen is doing in this photo from Cheeseslave. Either way, the point is to allow the salt to draw the liquid out of the cabbage. Don't give yourself carpal tunnel syndrome, but do allow the cabbage to get wet.
3. Taste the cabbage.. it should be distinctly salty. If it is pleasantly salty, add some more salt. If it makes you want to gag add some more shredded cabbage :)
4. Rinse your hands off and start packing the jar. Use a wooden spoon or wooden meat pounder or small ladle to help you really pack the cabbage into the jar. You want to push any air bubbles out. Pack it in a small amount at a time until the cabbage is within 1/2 an inch of the bottom of the threads of the jar.
5. Push on the kraut one last time. If liquid isn't rising above the level of the cabbage then make a brine of about 1 tsp of salt per cup of water (this should also be too salty to be pleasant but not salty enough to make you gag). Slowly pour a little of this over the cabbage, giving it time to sink in, until it is at or above the level of the cabbage.
6. Screw the lid on tight and put in a warmish place in your kitchen. On top of the fridge, the cupboard above the microwave, etc. Do the dishes and leave the cabbage for the day.

Phase Four: Fermenting and Ageing
1. The next day, open the lid of the jar. I recommend doing this over the sink. Did the jar "pop" or fizz when you opened it? If not, that's OK. Taste the kraut. Put the lid back on and put it back in the warm spot.
2. Repeat the last step every day until it truly is popping of fizzing. Taste it again, and then put the lid back on and put that jar in the fridge.
3. Let it sit for at least one more week and then test again. Sour yet? No, let it go anothe week. In the fridge this stuff will last for weeks and months and just get sourer and sourer. Most likely after 2 weeks in the fridge it will be quite sour, but since you've been tasting it the whole time you know what it's like and when you are going to enjoy eating it. I recently found 6 month old kraut in my fridge and it was sour like vinegar pickles. The salty cabbage will eventually get sour, you just need to give it lots and lots and lots of time if thats what you want.

Phase Five: Making the next batch...
Repeat from the beginning, adding some of your sauerkraut juice to the cabbage as your are packing it or instead of the brine.

Once you get the hang of this kraut method you can start making variations. Adding caraway or juniper berries is pretty traditional, as is sliced or grated turnips or carrots. Other vegetable or seasoning options are as limitless as your imagination. Try onions, garlic, seaweed, greens like kale or brussels sprouts, roots like burdock, horseradish or beets. Try mustard seed, dill, curry or hot peppers of some sort. If you add garlic, ginger, chiles and onion you have kim chi but if you use oregano, chiles and cumin you have cortido. I recently made an apple cranberry sauerkraut that is so wonderful. Experiment, it's your kraut!

Please feel free to post comments with your kraut questions, your kraut experiences and your favorite flavor variations. Your question may end up in my future post, Kraut FAQ :)