*** **** *** **** ***
Congratulations! You are now the steward of an amazing life form, kefir, that will provide you with cultured milk very little work on your part. You are the next a long and unbroken line of stewards that stretches back into the mists of time. Interestingly, no one really knows where kefir comes from or how it first came about. It is believed that the first kefir drinkers came from the mountains of the Caucasus where it is considered a gift from the gods. They may be right because no one has been able to grow kefir in a lab without a starter. Every kefir grain in the world is descended from those original grains.
Kefir grains, as they are called, are not really grains or seeds at all. The spongy “grains” are a colony of yeast and bacteria that convert the sugar in dairy milk into their own spongy outer covering, energy to live and reproduce and a whole host of acids, vitamins and alcoholic byproducts of their metabolism. The grains will grow and reproduce in any dairy milk and like to stay at room temperature so no heating is required. You can also use the grains to ferment other sweet liquids but the grains won’t reproduce. For more information on the microbiological make up of kefir grains, or for any other kind of information you could want about kefir, be sure to check out Dom’s Kefir In-Site.
Care and Feeding of Your Kefir Grains
The Very Basics
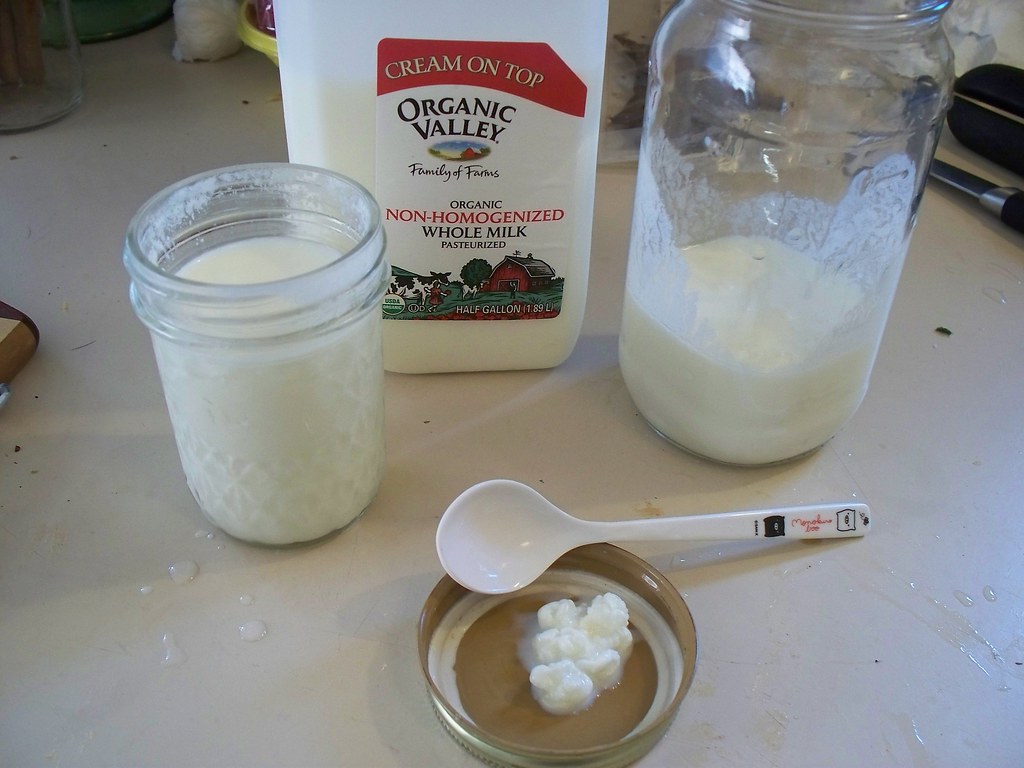
2 tbs of kefir grains
2 cups of milk
Place the kefir grains and milk in a glass jar with a lid and leave at room temperature until the milk thickens and sours. Strain the kefir, reserving the grains. Add the grains to fresh milk and store the finished kefir in the fridge until you use it.
See, wasn’t that easy?
Beyond the Basics
They also like to stay at a comfortable room temperature, somewhere between 50 and 70 degrees Fahrenheit. That being said, they are resilient buggers and can bounce back from a lot of abuse.
The Milk
Kefir grains are at their happiest in dairy milk that is as close to the way it came out of the animal as possible. They love raw milk but do just fine in pasteurized milk. They do fine in cow or goat milk (or any other type of dairy milk you happen to have) and prefer whole, full fat milk. Low fat milk would be fine, but do not keep them in ultra pasteurized milk (which is actually shelf stable, they just sell it refrigerated because Americans won’t buy shelf stable milk), or non-fat milk for extended periods. If you must buy these types of milk treat them as non-dairy milks, discussed below.
Oh – someday you should try popping your kefir grains into whipping cream. You will never look at sour cream the same way again. Yum!
The Grains and Separating Them
It is suggested to use 1-2 tablespoons of kefir grains to 2 cups of milk and let it ferment at room temperature for 24 hours. You will learn to adjust the amount of milk based on how your kefir grains are doing at culturing milk, the ambient temperature and how many grains you have available. Remember, these guys are hardy and will culture your milk as best they can in a wide variety of circumstances.
You don’t need to rinse your kefir grains (except in special cases as talked about below), just transfer them. They should be clearish white, quite puffy and complex and soft to the touch with a slimy coating. If they are hard, or yellow or smooth they are unhappy and you should check with Dom’s Kefir In-Site to see how to help them, or if they are beyond help.
To separate the grains from the finished kefir you can either strain the kefir through a wire mesh (or plastic, or bamboo) strainer, or fish them out with a spoon or fork. For a long time I fished mine out with a small wooden fork and liked the ease of this method. Any grains I didn’t ‘catch’ just stayed in the kefir and got blended when I made smoothies. I now tend to strain and like that method for two reasons. One, it catches all the tiny baby kefir grains that start to grow in the kefir and two, it helps break up and smooth out the curd of the finished kefir.
Utensils and Jars
I culture my kefir in glass jars with a screw top lid. I tend to ferment mine with the lid on tight because I am afraid of knocking it over and spilling it, but many people suggest leaving the lid slightly ajar, or using a towel or coffee filter over the top of the jar instead of a solid lid. A tight lid allows the kefir to get more fizzy and may alter the amount of alcohol in the finished kefir. Check Dom’s Kefir In-Site for more information about various ways to effect the final fermentation.
It is fine to use stainless steel strainers or utensils to handle kefir, but please make sure they are clean and not left in the kefir for an extended amount of time. Do not use any reactive metals like brass, aluminum, cast iron, or copper. Kefir is acidic and these metals are bad news with acidic food. Plastic or bamboo are other fine choices for handling kefir.
How do I know it’s Ready?
You will know the kefir is ready to strain because the milk will have thickened and smell sour rather than sweet. At first it will be like the consistency of buttermilk, store bought kefir or drinkable yogurt but eventually the kefir will curdle and separate. When this happens you will see a thick layer of white curds floating on top and a thin yellowish liquid below. Taste your kefir at various stages to see which you like to drink – most people prefer it when it has just thickened but I don’t mind curdled kefir, myself.
If the kefir has curdled I make sure the lid is on tight and shake the jar to break up the curds. Then I separate the grains through a strainer and the finished kefir is perfectly good for baking or sweetened smoothies. Remember, kefir is a mix of bacteria and yeast so it will always have a bit more of a yeasty flavor than yogurt or even store bought kefir (which by law is not allowed to have yeast in it). Experiment with more milk or less time if your kefir is too “ripe” or sour for your tastes.

Photo by David Niergarth.
Resting Your Kefir Grains
Your kefir grains will keep fermenting milk into kefir indefinitely as long as they have good milk and proper temperatures. But sometimes you need a break either because you have too much kefir or you won’t be able to strain the grains every day. Luckily, you can refrigerate the kefir grains for up to a couple months with no detriment to the grains.
When you are ready to give your grains a break put them in a clean jar with the same amount of fresh milk that they have been fermenting in a 24 hour period. Dom recommends this amount of milk for resting your grains for up to a week. He suggests increasing the milk by about 30% for each additional week of storage, or you can simply strain the kefir out each week. I have kept 3 tbs of kefir grains in a cup of milk for a couple months at a time and the grains have bounced back just fine. The kefir you strain off the grains after their rest in the fridge is perfectly safe to drink, though it may be thinner or more sour than usual.
Do note that different strains of bacteria and yeast respond to cold storage differently so kefir grains usually require a little care when coming back to full fermenting strength. They should also get to come out of the fridge and ferment at room temperature for a week or so every couple weeks or months so they don’t get too out of balance.
When bringing kefir grains out of the fridge strain them off the old kefir and put fresh milk over them like normal. I usually use a smaller proportion of milk than usual, and change the milk as soon as it seems sour, even if it is a slightly different consistency than usual. The kefir should come back to what you expect it to be within one or two cycles with fresh milk.
Culturing Non-Dairy Beverages
Kefir grains need dairy milk to grow and reproduce but they will culture any liquid into a probiotic beverage. There are two ways to culture non-dairy beverages – switching the grains back and forth, or sacrificing some of the grains to the non dairy beverage.
If you are going to make non dairy kefir only occasionally it is best to switch the grains back and forth. I occasionally make coconut milk kefir by plunking the strained grains into canned coconut milk and let that ferment for 12 or 24 hours. When the coconut kefir is ready strain out the grains and put them back in dairy milk. I often rinse my grains before putting them back in the dairy milk thinking that the surface of the grains needs to be in good contact with the dairy milk. Dom cautions against rinsing in most situations, and I am careful when rinsing to not contaminate the grains.
If you want to continuously ferment non-dairy kefir you should hold back a portion of the grains in dairy milk and use another portion for the non-dairy milk. Use the grains in soy, almond or coconut milk the way you would in dairy milk just being sure to note when they are no longer healthy looking or fermenting properly. Keep another portion in dairy milk so that it keeps growing and you have some to replenish your non-dairy grains when they no longer ferment properly. I’ve never done this method myself, but have heard of others doing it with great success.
You can also play around with fermenting juice or sugar water as well. It often goes alcoholic, but sometimes turns out very tasty.
What To Do With All Your Kefir

Kefir is great in smoothies and baked goods and in a million other dishes. It can basically be used anywhere you would use buttermilk, but it does have a bit of a yeasty flavor that can be unwelcome in some dishes. In other dishes you’d never know the milk was cultured. Here are my favorite ways to use kefir.
*Smoothies. Combine the kefir with frozen or fresh fruit, juice, ice, and sweetner of your choice in a blender to make a delicious smoothie. Add coconut oil, nut butter or good quality egg yolks to boost the protein and fat content, or use more juice to make it lighter. You can blend the kefir with a little fruit syrup or pulp to make it more like the flavored kefir at the store. Experiment with green smoothies!
*Blender Batter Pancakes. This is a method for making pancake or waffle batter by soaking whole grains in kefir overnight and then grinding in your blender. Here is Sue Gregg's original recipe, and here is my blog post on the recipe.
*Kefir naan or flatbread. This is a neat recipe where you combine kefir and wheat flour, knead it like regular bread dough, then let it raise overnight. The natural yeast in the kefir is all the leavening you need. It is a very sour dough but tender and delicious. Cook like naan or pita on a griddle, use as a pizza crust or bake as rolls. Here's the link to the website, and here's a photo and write up of the time I did it.
*Macaroni and cheese. Just use kefir instead of milk for boxed or real cheese sauce.
*Clafouti. This is a delicious, rustic French dessert (or decadent breakfast) that is essentially an eggy pudding studded with fruit. Here's the recipe I use. I just substitute kefir for the milk and use whatever fresh or frozen fruit you have.
This post is a part of Real Food Wednesdays. Check out more real food blogs at the carnival!