Showing posts with label greens. Show all posts

Sunday, April 17, 2011

Lima Bean Soup

April is a month for babies, isn't it? I mean, I'm sure perfectly lovely children are born in other months of the year, but the height of spring seems a perfect time for new life like chicks, lambs and babies. A friend of mine had twins at the beginning of the month and in addition to taking her dog hiking last weekend I made her a soup. She is a vegetarian so I was looking for something hearty enough for someone eating for three, simple and frugal enough that I could make a giant batch for two households, and that would be delicious. I decided on a lima bean soup using home made vegetable broth and dried lima beans. At the bottom of the recipe are some non-vegetarian options for those of us who appreciate the nourishment that comes from bone broth.

Veggie Lima Bean Soup

1/2 pound dried lima beans, sorted, rinsed and soaked in water overnight.

For the veggie broth:
1/2 a yellow onion
2 stalks of celery, broken to fit in the pot
1 carrot, chopped in two or three pieces
1 small potato, scrubbed and quartered
2 cloves garlic, cut in half
Small bit of arame seaweed (optional)
A couple pieces of dried mushroom
1/2 tsp herbs de Provence and/or Italian seasoning
A couple peppercorns
Salt
Trimmings from the vegetables for the soup

For the soup:
Olive oil, butter and/or coconut oil
1 yellow onion, chopped
4 stalks celery, sliced
2 large carrots, chopped (note: should be about equal on those three)
2 cloves garlic, minced
herbs de Provence and/or Italian seasoning, red chili flakes if you'd like
black pepper and salt
2 tsp soy sauce
1 tbs lemon juice
red wine, Worcestershire sauce, vinegar

Start by making the veggie broth. Cover all the vegetables and trimmings with water, bring to a boil and simmer for about 40 minutes. I didn't add very much salt to the broth because I am always afraid beans will stay hard if well salted. The above made about 2 quarts of broth.

When the broth is done or mostly done, start heating the cooking oil over medium heat in a large enameled, cast iron dutch oven. Turn the oven on to 300 degrees. When the fat is hot add the vegetables and dried herbs. Add some salt and pepper at this time. Again, I under-salt because I'm afraid for the beans. Stir and cook until they are starting to turn golden brown. Add the garlic at this time and stir another minute until fragrant.

Strain the veggie broth into the soup pot and turn the heat up to high. When the broth is close to boiling add the drained lima beans, a splash of soy sauce, and a splash of lemon juice. When the soup is just coming to a boil put the lid on the dutch oven and put it in the oven to cook.

Check the beans at 1 hour to see if they are tender. If not, continue cooking and checking every 30 minutes. I didn't time mine but they couldn'tve take more than an hour and a half. When the beans are tender bring the pot out of the oven and adjust for seasoning. Add salt at this time, and maybe a splash of wine, more soy sauce, some Worcestershire sauce and/or vinegar. Hot sauce would be nice if you are into that kind of thing.

You can drop some tender greens like chard or spinach in the pot at this time, or add the raw or cooked greens to each bowl to get wilted. Serve with toast, croutons, sour cream, sauerkraut or any condiment that sounds good.

***

I actually really appreciate the pure and simple flavors in this soup. The beans are so soft and delicious. How did lima beans get a bad rap? I guess generations of moms have made spinach taste bad too. Criminal.

When I had some of this for my own lunch I fried up some bacon and crumbled that on top of the soup (ok, I also drizzled some bacon grease over top too...) If I were making this for myself I would do any number of the following:

*Use chicken stock instead of the veggie broth. Though, I gotta say, the veggie broth really does leave the dish very pure and light. But still, chicken broth for me.

*Add some bacon, sausage or chicken. Beans and pork are a classic combination, but again I love the pure flavor of this dish so I might use bone-in, skinless chicken thighs instead.

*Use chicken fat instead of the olive oil and butter.. though, refined coconut oil is a fine, neutral flavored oil for sauteeing veggies.

All that being said, this is delicious and as easy as falling off a log, especially if you have chicken stock in the freezer already. And it was greatly appreciated by my new mom friend and her boys.

Wednesday, May 6, 2009

Greens, Greens, All the Meadow is Greens!

I didn't grow up eating greens. Honestly, I'm still getting used to the idea. As a kid we occasionally had spinach, though usually as salads not as a cooked vegetable. These days my dad is known to cook some napa cabbage I'm pretty sure he never cooked collards or turnip greens for us. We probably wouldnt've eaten them.

My first real introduction to greens came a number of years ago when I was working at a school with an organic garden. The woman who had planted the garden had planted about a dozen kale plants and they survived right through the winter. No one I worked with particularly liked kale and the plants were a bit aphid infested so we didn't want to donate them to the food bank. Being the poor AmeriCorps member that I was I decided to take these giant leaves home and see what to do with them.

I consulted my favorite source for basic cooking instructions - Cook's Illustrated. They recommended a steam sautee method where the greens are cooked over or in a small amount of water and then sauteed in flavored oil. Yeah, that's good stuff. Especially when that flavored oil is bacon grease.

This method works particularly well for hearty greens like kale, collards and turnip greens. I prefer a simple sautee for tender greens like chard and beet greens.

Last year as I was learning about edible plants I kept running into a lot of plants referred to a potherbs. These are green plants who's leaves are best eaten cooked as opposed to salad greens. As some of these "potherbs" showed themselves this spring I realized it was time to learn to love greens.

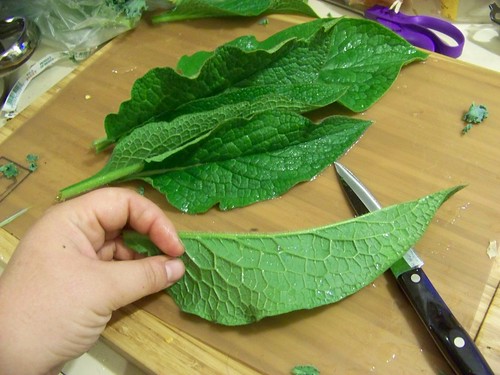
Nettles and comfrey are two greens that grow abundantly in my neighborhood and have found their way into my kitchen recently. I experimented with nettles earlier this spring and love their flavor but hate having to deal with them. They taste minerally and are wonderful well salted. Last week I harvested some comfrey that I had scouted out last summer but hemmed and hawed over eating at that time. Many sources note that comfrey contains chemicals called hepatoxic pyrrolizidine which can cause liver damage. Susun Weed speaks eloquently about how comfrey has gotten this, in her research and experience, undeserved reputation. The basic gist of Susun's article is that the toxic chemicals are found in the wild comfrey, not the cultivated one, and even then mostly in the roots and to a lesser degree in the stems and leaf ribs. The tipping point for me was when I saw comfrey listed in my Joy of Cooking as an eating green. Sauteed greens, here I come!

Steam-Sauteed Hearty Greens

1 bunch of kale or collards or mustard greens or comfrey or a mix
2 cloves garlic, sliced
1 tbs bacon grease, or olive oil, or coconut oil
a shake of red pepper flakes
a pinch of salt
a dash of red wine vinegar

*Clean the kale and remove the leaves from the stem. Chop or tear the leaves into fork sized pieces. Heat a couple inches of water in a pan big enough to hold all of the kale. When it is boiling add the greens, stir a bit with a wooden spoon or tongs and cover. Let the kale steam a minute up to five then drain in a colander.

*While the kale is draining and drying a bit heat the fat in a sautee pan or wok. Add the garlic and red pepper and cook until the garlic is starting to brown a bit. Add the kale and toss and turn with tongs. Cook until the kale is fully incorporated with the flavored oil. Sprinkle with salt and then finish with vinegar.

I used the same steam-sautee method with the comfrey as I do with kale only made sure to cook it well in the water first. With kale I only steam it until it changes color but I made sure the comfrey was cooked through. I also made sure to harvest the smallest leaves I could find and remove all the ribs from the leaves. It was just a gut feeling, but I went with it. Wild vegetables are not terribly interested in you eating them, so it's best to treat them respectuflly. I sauteed it in refined coconut oil with some garlic and chipotle flakes. It was fantastic.

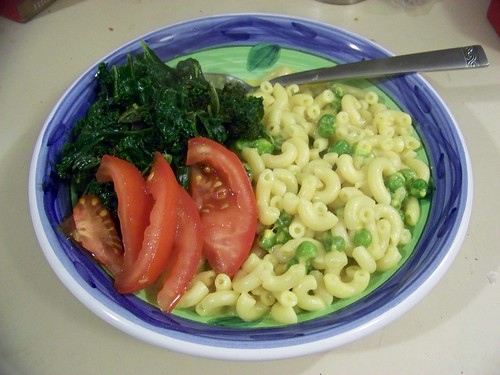
If you haven't grown to love greens yet start with chard. Chard is a sweet, tender little green with hardly any of the bitter flavors or odd texture other greens can have. Use plenty of garlic, bacon or other good cooking fat and a goodly splash of vinegar right at the end. You'll be enjoying greens and ready to move on to potherbs in no time. And if all else fails, eat them with macaroni and cheese. You can handle just about any vegetable mixed with macaroni and cheese.

For more great recipes and real food ideas check out the Real Food Wednesday blog carnival!


Wednesday, March 25, 2009

Square Foot Gardening


For this week's Real Food Wednesday blog carnival I'll tell you a bit about my gardening experiment. I've been wanting to garden for years but the school/seasonal job year happens to perfectly bisect the growing season year. It's hard to get excited to plant stuff in April and May when you know you are going to be moving in June or July. Luckily for my gardening aspirations I have a "real" adult job this year and no plans of moving anywhere! I am actually going to be planting two gardens this year, one in the little yard at my duplex and a bigger one in my parents' backyard up the street.

Last fall I bought a copy of Mel Bartholomew's All New Square Foot Garden and have been reading it voraciously. Square foot gardening is an intensive planting method using prepared soil (instead of native garden soil and amendments) that is designed for people who want the joy of gardening without the hassle of huge harvests or the hard work of tilling and weeding. As I do more reading about it I see some draw backs, but for the first year of my garden experiment I am willing to give it a try. The basics of square foot gardening include the square foot grid that you plant within and Mel's Mix soil. Both take a little work up front, but I think they will repay serious dividends over the course of the year.

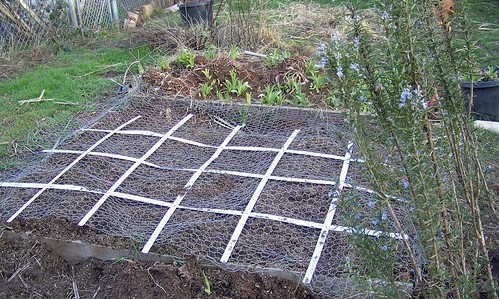
My garden at my parent's house is a 4x6 foot plot that had tiger lilies in it for the last few years. If you ever want to do some hard work, dig out overgrown lilies. I'm afraid I won't enjoy the blooms this year :) I dug the bulbs out and laid in a couple layers of mulch and peat moss and then covered it with about 5 inches of Mel's Mix from the book.

Mel's Mix is a 1:1:1 ratio mixture of vermiculite, peat moss and mixed compost. At first I was put off by the "buy stuff" nature of the Mel's Mix but I decided to go for it. I tried container gardening in a mixture of wood compost, top soil and native garden soil last summer and all my plants starved to death. I was willing to put out some expense to get usable vegetables this year :) I was able to purchase all three of these ingredients with minimal hassle or expense. I purchased a 4 cubic foot bale of compressed peat moss for 10 dollars, 3 one cubic foot bags of compost (steer, chicken and mushroom) for 5 dollars a piece and the 3 cubic foot bag of vermiculite for 50 dollars. The vermiculite is clearly the expensive part of the formula but it provides good structure and air pockets to the soil and really should be a one time investment. In the future I will have a compost system set up so I won't have to buy compost, and that looks like the only thing you have to add in the future anyway.

Over the Mel's Mix I laid my grid. Mel recommends wood lath to form the grid but I happened to have a bunch of broken venetian blinds laying around so made my grid out of that. The square foot gardening method calls for planting a proscribed number of plants in each square foot, alternating what plants are in each square. It's a block planting system instead of a row planting system, but the plants have the same room around them in the end. For instance, you plant 4 lettuce plants in a square which is equivalent to the "thin to 6 inches" instructions on the back of the seed packet.

The other really amazing part of the square foot gardening book is the time tables in the back for when to plant. He lays out a planting schedule based on weeks before or after your local last frost date so you can use the system almost anywhere. Here in Portland, OR our last frost date is in the second week of April so I am already planting some hardy spring plants. I have already planted snow peas, lettuce, turnips, mustard, radishes and onions, and will plant some chard, bok choy, more onions and lettuce, and kale or broccoli before the spring is too much further along.

Later in the summer I will plant tomatoes, cucumbers and zucchini but haven't decided exactly how to fit those into my gardening plans. Mel Batholomew claims you can plant all of those plants in the square foot garden with trellises, but I'm thinking I may use the plot at my house for a less structured garden with more room for each of those big plants.

My next big challenge is protecting the garden. First and foremost I need to protect it from the two big black dogs that share the backyard with my garden. My dad's dog particularly likes to dig but both will tromple right through it given half a chance. Right now I have chicken wire laid over the soil but once things start sprouting I am going to need to change that a bit. I've got some ideas floating around in my head, but we'll see how any of it actually works out :)

I'm dreaming of lettuces and radishes out of the garden, tomatoes warm from the vine and cucumbers plumping in the sun. Spring, however, is wet and long here in the pacific northwest and it will be quite a few months before there are any backyard barbecues featuring garden fresh onions and zucchini. Ya know what though, the rain doesn't seem to bother me quite as much when I know it is watering my garden for me :)

Thursday, March 5, 2009

I Had Never Made a Quiche Before

I had never made a quiche before, but now that I have I will certainly make more! It was a very easy and tasty week night meal. This recipe is based on Julia Child's spinach quiche, but changed around a little bit. I used a store bought crust made with non-hydrogenated oil and organic flour, which I felt was a fine compromise.

Sausage and Kale Quiche

1 prebaked and cooled 9 inch pie crust

1 cup chopped chicken sausage - I had andouille - or cooked spicy sausage
1 1/2 cups chopped curly kale
2 cloves garlic
2 green onions (or a small amount of sliced white onions)
salt, pepper
bacon fat

3 eggs
3/4 cups kefir
3/4 cups half and half (or 1 1/2 cups dairy product of your choice)
1 cup shredded cheese (I used fontina and cheddar)

*Brown the onion and sausage in the bacon fat in a sautee pan. Add the garlic and salt and pepper and sautee another minute. Add the kale and toss and stir to get the fat all over the greens. Cover the pan and turn heat to low, stirring occasionally until kale is wilted and cooked. I deglazed the pan with a little vegetable broth, but water could be used. Cook until the liquid is almost all gone from the pan.
*Combine the eggs and dairy, either with a whisk or in the blender. Salt and pepper appropriately.
*Sprinkle the crust with half the cheese and then lay the cooked kale/sausage mixture in the crust. Pour the egg mixture over the kale and then cover everything with more cheese. I sprinkled a little paprika on top for color.
*Bake 25-30 minutes (mine took more like 35). The recipe says to serve immediately but I prefered the texture and flavor when it was cooled overnight.

I'm imagining the quichy possiblities - spinach and ham, broccoli and bacon, tomato and parmesan... mmmm. Quiche!