Friday, June 12, 2009
I Tempted Her With Pheasant
Tuesday, June 2, 2009
Pokrov Farm Tour
A couple of weeks ago I was lucky enough to visit Kookoolan Farms in Yamhill, OR and this week I got to visit Pokrov Farm outside of Sandy, OR. I met Genevieve, one of the farmers, through my local Weston A Price Foundation email list when she advertised that her farm had CSA shares available for the summer. I jumped on board and am eagerly awaiting my first CSA basket - it
comes next week! I happened to be driving by her place last weekend and stopped in to meet her family and tour the farm.Their farm is set on a hill outside of Sandy, OR on the flanks of Mt. Hood. They are leasing 35 acres of some of the most beautiful farm land in western Oregon. They have green meadows, big trees, a creek and a pond, a couple barns and a lovely farm house. I pretty much want to move in with them. Genevieve is deeply inspired by Joel Salatin and his farming methods and attended a workshop in Southern Oregon last fall that led her to find this farm for her family. She is now homeschooling her children as well as running the farm along with her husband and two housemates. They've only been on the land since November but already have a lovely vegetable garden, about a million chickens, a milk cow and a couple happy pig and goat families.
One of the housemates (forgive me, I've forgotten his name - though I'll probably learn it next week at the CSA pick up) is a certified Master Gardener and in charge of the vegetable patch. It
They are using some old fashioned labor to till and fertilize a new extension to the garden - pigs! They've got a pair of pigs and this year's piglets fenced into an area that was weedy and dry just a couple weeks ago. As you can see the piggies are enjoying their mud baths as they dig for roots and insects and enjoy fresh air and sunlight. That is going to be some vitamin D rich lard! I found it really interesting when Genevieve mentioned that another farmer asked about renting her boar to breed with their sow. Apparently it is virtually impossible to find old fashioned pigs to make baby old fashioned pigs because most pig farmers use artificial insemination to breed in "new and improved" characteristics into their herd. Genevieve, with her everpresent optimism and openness said, "Sure! Let me research how to do that!".
Pokrov Farm seems to be crawling with chickens. Happy, outdoor, bug eating chickens! They have two big barns that both have adult chickens in them as well as a big room full of baby
In one of the chicken houses they have a Joel Salatin style rabbit set up with the wire bottom cages over where the chickens are. The chickens scratch the rabbit droppings and keep the area clear of insects that might bother the rabbits. One of my favorite parts of the tour was getting to see the brand new baby rabbits. One mama rabbit had kindled her kits
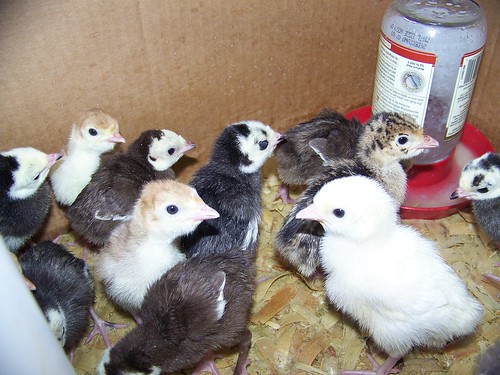
The other babies I got to see at the farm were baby goats, baby geese and baby turkeys. Genevieve ordered a mixed pack of turkey hatchlings so she doesn't even know what breeds they are. I ordered one for my thanksgiving dinner.... I'm not sure how I would feel about raising them from these tiny fluffy babies into dinner, but I'll be happy to eat them when they come my way! The geese were possibly the cutest things ever, but I didn't get a good picture. They were fuzzy and yellow, like cartoon ducklings. Genevieve is keeping a couple pygmy goats for milk and they had just kidded that week. I picked up one of the kids and it was tiny, like a puppy!
Genevieve's pride of the farm is her Jersey cow, Ella. Ella is producing milk that Genevieve is drinking and selling raw, as well as making cheese. She is planning on holding cheesemaking classes through the summer as well as other workshops. Genevieve was commenting on how they have been having a fly problem with Ella and are having a very hard time finding advice on
Genevieve and her family are an inspiration to those of us with homesteading ambitions. She says she had been an urban homesteader in Portland, keeping chickens and digging up her lawn to plant vegetables. She and her husband saw an opportunity to move up a notch and have a real farm and have taken it. They are working hard and have lots more to go before they are assured a financially profitable farm, but they are supplying themselves with most of their own food. I am very proud to be able to support them this summer and have them support me! I can't wait to go out for a cheesemaking class or to harvest apples or fish trout in their pond. On top of it all, Genevieve is one of the most welcoming, optimistic and just plain sweet people I've met in a long time.
Now it's time for you to find a farm to go visit! Buy a CSA share, find someone producing raw milk or free range chickens! Go out there and meet your meat and veg with your veggies!
For more posts about REAL FOOD like the kind you get at small family farms check out the Real Food Wednesdays and Food Roots blog carnivals!
Wednesday, May 27, 2009
You can please some of the people all of the time...
So the saying goes, and so it goes in the kitchen. As a relatively skilled and confident cook who prim
Two months ago I bought a tub of chicken livers from Kookoolan Farms at our year round farmers market here in SW Portland. I had never cooked with chicken livers before and honestly never really eaten them either. I was a little intimidated but knew I would get around to them eventually.
Liver is quite possibly the most nutrient dense animal food on earth. Oysters may be a close second but liver is an amazing super food. Liver is chock full of vitamins A, B12, and folic acid. It is amazingly high in bioavaliable iron, copper, zinc and chromium. It contains nitrogen compounds that the body uses to produce DNA and RNA. It's also an amazing source of CoQ10. Seriously, this is some healthy health food.
Unfortunately, most Americans aren't very fond of organ meat. We didn't grow up eating it (possibly because our grandparents had to eat it during hard economic times and forced their kids to eat it who swore to never force their kids to eat it) and many folks think it is gross or dirty. There is also advice out there to avoid liver when pregnant because of it's high levels of retinol, a form of Vitamin A that seems to have been linked with birth defects.
Actually, even main stream nutritionists agree that an animal's liver doesn't store toxins, it just repackages them for storage elsewhere in the body. The vitamin A debate seems ridiculous to me. Native people ate liver as regularly as possible and no one died
I don't know about you, but I couldn't get 16 oz of chicken liver in me every day for a month. I couldn't get it in me over the course of a month if my recent liver experience is any indication. Remember how I said I don't usually have flops in the kitchen? Yeah, my chicken liver pate was a flop. I think it tasted exactly like it was supposed to, I just didn't like it. Here's the recipe I used. It's a variation on the recipe from Nourishing Traditions and I think it's a good one. It's just so, well, livery.
Chicken Liver Pate
3 tbs butter
1 lb chicken liver
1/2 lb mushrooms
1 medium yellow onion
2/3 c white wine
2 clove garlic
3/4 tsp ground dried rosemary
1/4 tsp ground dried sage
1/4 tsp crumbled dried organo
1/4 tsp dried dill
1 tbs lemon juice
4 tbs butter
salt and pepper
*Sautee the onion and mushroom, seasoned with pepper and a little salt, in 3 tbs of butter until soft. Add the liver, trimmed of the tendons and cook until firm but still barely pink on the inside. Add garlic and herbs to the pan then the wine. Cook over medium heat until the pan is almost dry. Let mixture sit until cool.
*Pour the liver and onion mixture into a food processor. Grind until a coarse paste and then add soft, but not melted, butter a spoonful at a time. Grind until smooth. Add the lemon juice and taste for salt and pepper.
This recipe actually had a lot of interesting flavor. I think in the future I would increase the herbs a bit but the mushrooms and liver really stood out. The problem is, well, that liver flavor. It's kind of metallic, and kind of earthy. But not in a good way. Luckily my roommate loved it and I found that I could get down a couple tablespoons at a time in a sandwich with radishes, cheese and mustard. I still have about 4 oz in the freezer. Maybe in a month or two I'll be ready to go back for round two.Photo by These Days in French Life
Do you have a liver recipe you like? Have you ever eaten a liver pate that you really enjoyed? What do your friends, kids, spouse, housemates say about liver? Like runny egg yolks, I'll choke it down until I like it... it's just that nutritious.
For more real food recipes and tips check out the Real Food Wednesdays blog carnival!!
Sunday, May 24, 2009
Kookoolan Farm Tour
Kookoolan Farm is a small, pastured based farm in Yamhill, OR about an hour outside of Portland. Chrissie and Koorosh, the farmers, keep three Jersey cows for raw dairy, chickens for eggs and meat and have a licensed poultry processing facility there. They also partner with what i
The first thing my students noticed was the 3 week old calf tethered in the front yard. He was born on the farm and was tethered out so visitors could pet him to gentle him. One thing I found really interesting was Chrissie's comments on her Jerseys being, em, insistent mothers. As a dog person this makes perfect sense. When we breed a strain of animals to do one thing we get a fair amount of "logical conclusion" behavior. For example, Labradors have been bred to retrieve and many labs have weird mouthy/eating/carrying things around behavior. Jack Russell terriers were bred to chase rats so we see obsessive chasing and visual stimulation behaviors. Well, apparently when we breed cows to do nothing but be pregnant or nursing we get some "logical conclusions" behaviors around mothering. Chrissie says one of her cows gave birth and the other two were mothering the one calf so aggressively that she had to buy two more calves from other local farmers. This is one of her teddy bear calves. He is 5 days old and he sucked on my thumb. Soooo cute!! Baby cows are pretty much adorable.
Next we got to tour the chicken houses. Kookoolan has had up to 500 chickens at a time, though
It was fun to see the different personalities of the different chickens. Some came right up to use to see if we had anything for us while others scattered as we came near. Chrissie is raising another 100 chicks in a brooder with the hopes of having them come into egg laying around Christmas, when her current layers will be on their winter break. This will provide her with a steady supply of eggs through the holiday season, when we humans like to eat eggs in things like pumpkin pie.
We also got to see the milking house and talk a little bit about raw milk production. In Oregon it is legal to sell raw milk on the farm if you keep only a small number of animals and don't advertise. The kids noted some chickens drinking some milk out of a pan on t
Another thing that so impressed me about Chrissie and Koorosh is the partnerships they've been able to form with other farmers in their area. They are raising beef with their immediate neighbor who is now 70 years old and doesn't want to work as hard as he used to. He raises the calves on his land and Chrissie and Koorosh market the meat to real-food aficionados in Portland who will pay top dollar. They've formed a similar partnership with a neighbor across the highway who raises lamb. For years he was driving to Woodburn to sell his gr
The most amazing part of all of this is that Chrissie and Koorosh have only been doing this since the fall of 2005!! Chrissie says she never even had a pet before they bought their first batch of day old chicks. They had never milked cows or butchered chickens. They were managers at Intel and are simply willing to take the risks required to start a farm. Chrissie says she works harder now than she did at Intel, but is happier and healthier by a country mile.
Every kid should get to visit a farm, and every person should get to eat food produced with as much attention and care as the food produced at Kookoolan Farms. You can see more of my photos from the farm visit on my Flickr page. Also, please check out their website for more information on their practices, their cheesemaking classes and their offerings. And then find a farm like them near you to get your own real food.
Wednesday, May 6, 2009
Greens, Greens, All the Meadow is Greens!
the food bank. Being the poor AmeriCorps member that I was I decided to take these giant leaves home and see what to do with them.
at that time. Many sources note that comfrey contains chemicals called hepatoxic pyrrolizidine which can cause liver damage. Susun Weed speaks eloquently about how comfrey has gotten this, in her research and experience, undeserved reputation. The basic gist of Susun's article is that the toxic chemicals are found in the wild comfrey, not the cultivated one, and even then mostly in the roots and to a lesser degree in the stems and leaf ribs. The tipping point for me was when I saw comfrey listed in my Joy of Cooking as an eating green. Sauteed greens, here I come!Saturday, April 25, 2009
Waiter, there is too much pepper in my paprikash...
- 3 boneless skinless chicken breasts, sliced (or equivalent dark meat, or chicken pieces)
- 3 tablespoons of butter, plus some olive oil plus some bacon grease
- 1 medium onion, sliced
- 3 cloves of garlic, minced
- 6 oz of mushrooms, sliced (could be replaced with green bell pepper or omitted)
- 1/2 cup chicken broth
- 3/4 to 1 cup sour cream
- 3-4 tablespoons of paprika*
- salt and pepper
Sautee the onions and mushrooms in butter, seaonsed lightly with salt and pepper, until well cooked but not too browned. Remove from pan and cook the chicken in more butter along with the garlic. (If I had had skin-on pieces of chicken I would have reversed the order of cooking here) Sprinkle the chicken with salt, pepper and paprika. Cook until the paprika is well blended into the fat and getting fragrant.
Monday, April 13, 2009
Adventures in Roommates, and Ketchup
*Wrap the cloves, celery seed, chile flakes and cinnamon stick in a cheesecloth bundle. Combine everything except the second piece of onion and garlic in a heavy bottomed,
Tuesday, March 31, 2009
Something to Stew Over
Wednesday, March 25, 2009
Square Foot Gardening

For this week's Real Food Wednesday blog carnival I'll tell you a bit about my gardening experiment. I've been wanting to garden for years but the school/seasonal job year happens to perfectly bisect the growing season year. It's hard to get excited to plant stuff in April and May when you know you are going to be moving in June or July. Luckily for my gardening aspirations I have a "real" adult job this year and no plans of moving anywhere! I am
actually going to be planting two gardens this year, one in the little yard at my duplex and a bigger one in my parents' backyard up the street.Sunday, March 22, 2009
Blender Batter: Cornbread
When this happened to me last week I did, at least, have one shining beacon of hope. In addition to putting black beans in the crock pot I had started a batch of Sue Gregg's Blender Batter Cornbread. You knew the blender batter method made great pancakes (because I told you it did and you all ran out and tried it this weekend, right?) but did you know it makes an amazing cornbread too? It does! Sue's recipe calls for whole kernel corn and wheat berries processed the same way as for the blender batter pancakes. I didn't have any wheat berries in the house so I used white flour, which is lower in phytates than whole wheat (if you are really worried about
Be sure to check out Sue's recipe and then read on to see how I modified the recipe. Also, a chilling tale of new roommates gone awry, gnashing of teeth and flames. Seriously, keep reading.
2/3 cup coarse ground polenta
1 cup kefir, buttermilk or thinned yogurt
1/4 cup melted butter
2 eggs
2 tsp baking powder
1 tsp salt
1 cup unbleached white flour
*The night before combine the polenta and the kefir in a bowl. Stir to combine and leave to sit at room temperature over night.
*In the morning (afternoon or after work) pour the corn and kefir into y
*Preheat the oven to 350 degrees. In a separate bowl combine the flour, baking powder and salt. Combine the wet ingredients from the blender with the dry ingredients in a medium sized mixing bowl. Stir until they are combined, but still lumpy. You don't want to overmix quick breads or they will be tough.
*Generously grease an 8x8 baking dish and pour the batter in. Cook at 350 for 25-30 minutes or until a knife stuck in the center comes out clean. Serve with lots of butter and honey.
My beans were a bust but the cornbread turned out perfect. It was golden, lightly browned, light textur
Damage control was quick and some of the cornbread was even salvaged. I was angry and upset for a minute or two (my cornbread!!) and then we got down to the business of digging pyrex shards out of the linoleum. My cornbread! My beautiful cornbread!!
Luckily, I have this awesome recipe, more polenta in the cupboard and my roommate's pyrex dish to cook it all in.
Thursday, March 19, 2009
Blender Batter: Pancakes
Most of us in America grew up on some variation of fluffy, sweet, soft bread and pastries. My mom made sure we ate wheat bread, but it was as fluffy as the Wonder Bread my friends ate. And we certainly got bisquick pancakes, doughnuts, and white rice. As I learned more about nutrition I learned of the benefits of whole grains - increased fiber and increased nutrients. Then came Nourishing Traditions and their instructions for soaking or sprouting grains. Whoa - this is getting a bit heavy.
I'll be the first to admit that soaking or sprouting grains before consuming them is low on my priority list. I understand the benefits of reducing anti nutrients, increasing digestability and all of that. It makes perfect sense. Heck, I even believe that grains don't need to be the base of our diet. Humans have only been eating grains for a couple thousand years, compared with meat and vegetables which we have been eating since before we were even humans.
But then I found a recipe that makes it easy. Last year I was introduced to Sue Gregg's blender batter method of making pancakes and waffles. She uses a blender to grind a mix of whole grains and fermented milk into a slurry that becomes the batter to make your pancakes or quick bread. The more I experiment with this technique, the more I love it. I'm going to write out how I make pancakes here, but I highly recommend that you go visit Sue Gregg's site. She has lots of information, her original recipes and links to buy her books (anyone looking to buy me a birthday present? Yeah, email me, I'll send you my address :)
Her site is here: http://www.suegregg.com/
1 cup whole grain*
1 cup kefir, buttermilk or yogurt thinned to the consistency of buttermilk
1 tbs (or more) liquid fat - melted butter or coconut oil, olive oil, etc.
1 egg
1/4 tsp baking soda
1/2 tsp salt
1 tsp baking powder
up to 1 tsp vanilla extract and/or sweetner of your choice (optional)
The night before you want to make pancakes combine the grain and the milk in your blender. Using the pulse button start to grind the mixture. When the mixture starts to m
Let the mixture of grain and milk sit on the counter for a couple hours or overnight. If your blender is nicer than mine you can just leave it in the blender jar. Mine leaks at the bottom so I scrape everything into a bowl and let it sit on the counter.
In the morning grind the grain/milk mixture again to loosen everything up. Since I probably didn't grind it a full 3 minutes the night before I give it a good grind first thing in the morning. Add the egg and grind it some more. With the blender running ad
When you are ready to cook the pancakes (heat up you cast iron skillet, melt a bunch of coconut oil or butter in it, get everything hot, cook your bacon, etc) add the salt and leaveners. Again, do this while the blender is running to avoid clumping.
Cook your pancakes as usual, being sure to give the first one to the dog. That's traditional, remember? :)
*The cool thing about this recipe is that you can use ANY grain you want. The gluten in wheat is not very important when making pancakes so even if you aren't "gluten free"
These pancakes rock. No one would ever guess that they were whole seeds and fermented milk a mere 6 hours before. They generally don't have a "whole grain" texture, are light and fluffy, and incredibly flavorful. You can vary them any number of ways by adding berries or nuts, changing the grains, changing the sweetner and of course changing the toppings. I personally love jam and yogurt, but won't turn down a pancake with butter and maple syrup either.
I recently used this method to make a cornbread and am excited about branching out into other quick breads and muffins. The batter could also make crepes/tortilla-like-wraps if made thinner. I generally make a double batch and freeze the extras for quick breakfasts later on.
I just can't say enough good about this recipe and method. Give it a try, seriously. It's so versatile, and you feel so accomplished. "I used whole grains, soaked them and I can have a real breakfast all week!"
Tuesday, March 17, 2009
Coconut Oil Killed my Stink!

I have lots of reasons for rejecting commercial body care products. I don't like the chemicals, I don't like the marketing and in general I just don't believe my body needs quite so much "care" as Proctor and Gamble or Walgreens would like me to believe. For years I have been using baking soda and dish soap to do almost all of my household cleaning and this winter redoubled my efforts to remove chemical cleaners from my body cleaning routine as well.
This winter I made the switch to a no-poo method of cleaning my hair. I now use baking soda and apple cider vinegar and my hair looks great! I use only simple soap like Dr. Bronner's or local goats milk soap to clean my body and perfume free dish soap in the kitchen. Since I don't color, style or spray my hair I didn't have to worry about products for those "needs." The last hold out was deodorant.
I've spent a number of years accepting, and even cultivating, my "dirty hippy" persona :) I don't shave, I don't gel my hair, and only recently allowed myself to be held down to have my eyebrows plucked. I'm about as crunchy as you can get this side of dreads, patchwork corduroy or patchouli stank. That doesn't mean I particularly enjoy smelling like B.O. I gave up regular deodorant years ago because of aluminum and other health concerns but never felt my other options were particularly useful. I love all that Tom's of Maine does for this world, but controlling stink is not something they do well. I continued to use their deodorant for years because then at least I smelled like I was trying to control the odor but I certainly wasn't eliminating it.
Over the last few months I have kept running into blogs or flickr posts about homemade deodorant. I figured the universe was trying to tell me something so I did a little more research. Turns out, baking soda and coconut oil, two of my pantry staples that I already knew and loved the benefits of, were the base of most homemade deodorants. Baking soda is an moisture absorber and odor eliminator while coconut oil has some serious anti-microbial properties, as well as being a moisturizer and smelling wonderful. I saw that some folks had trouble with irritation when they used either baking soda alone or in high proportion to coconut oil and one recipe combined the baking soda with cornstarch or arrowroot powder. I took that recipe, added some tea tree and rosewood essential oils for their anti-microbial properties and amazing smell, and ended up with some amazing natural deodorant.
I've been using it for a couple weeks now and not only has it completely eliminated the unpleasant body odor on the days I use it (and leave a faint, pleasant natural odor) but it even has eliminated unpleasant odor on the days I don't use it! Wow!Homemade Deodorant
1/2 cup virgin coconut oil
4 tbs baking soda
2 tbs cornstarch or arrowroot powder, or more baking soda, or none of the above
2 drops tea tree essential oil*
6 drop rosewood essential oil*
- Melt the coconut oil gently in a jar with about 1 cup volume (I used wide mouth half pint jar and think it's a great size) either under hot tap water or in a gentle water bath. Coconut oil melts at about 75 degrees Fahrenheit so hot tap water is all you need.
- When the coconut oil is completely liquid stir in the baking soda and corn starch one spoonful at a time. Stir well and make sure to scrape the powders up from the bottom of the jar. Add the essential oils and stir to combine.
- As the concoction cools to room temperature stir it occasionally to redistribute the powders, which will sink in the liquid oil. There will be a magic moment when the oil is still liquid enough to stir but solid enough to keep the powder in suspension - find that moment and stir like the devil! If you are doing this during the heat of the summer when room temperature is above 75 use the fridge to cool the deodorant.
- Allow the emulsified oil to cool all the way to room temperature (it will probably want to be kept in the fridge in the summer to keep the powders emulsified). To use scrape a pea sized amount onto your finger and rub into your underarms. Your body heat quickly melts the ball of deodorant and you can smooth it all in there. I used a fork to break up the mass of oil so I could easily scrape out the right amount.
*I actually used 1 drop rosemary and 2 drops sweet orange in addition to the rosewood and tea tree, but don't recommend going out and buying those if you don't want to. Any essential oil or blend of oils that you like would work. Make sure they are high quality, natural oils. Go to the essential oil shelf of your local health food store and sniff away. Watch the prices though - some natural oils go for 5 dollars for a small bottle, other for 30 dollars.
I really, really like this deodorant. I won't have to make more for a long time - months at least - but when I do I will probably eliminate the cornstarch all together, and reduce the amount of baking soda even more. The first night I made it I didn't know to stir as it cooled so for the first few days I was using only scented coconut oil. It seemed to work just fine.
There are lots of reasons to avoid buying personal care products at the store. Money is a big one and so is the toxic chemicals used to produce those products. If you didn't read the article I linked to about marketing beauty products to women you should - it's bombastic and may be offensive, but so is how women (and men, to some extent) are seen by the people selling everything from shampoo to toothpaste to tampons. I don't have to support any of that when I make my own out of food products like this. Whatever I can do to support my health and a non-consumeristic culture is more than many are doing. And next time someone asks me what that tantalizing scent is I can say "my armpits."
Thursday, March 12, 2009
Bone Soup
There is a reason chicken soup is a food for sick people throughout the world. Studies are showing that the gelatin and other proteins found in properly made bone broth are essential in bone, joint and skin health as well as digestive health. In fact, bone broth is the base of the very popular GAPS diet for healing digestive and related psychological disorders.
Every Jewish grandmother knows that chicken soup heals, and as is usually true of grandmother's wisdom, science is finally coming around.Chicken broth is the most common homemade broth (in my kitchen and beyond) because we tend to collect more chicken bones than beef or lamb bones but I recently ventured into the land of beef stock. Last fall in a fit of panic over the economy and weather I went to a local discount grocery warehouse store and spent 75 dollars on food, including two packs of meaty beef "soup bones". I wrapped them up, threw them in the freezer and haven't looked at them since. Finally this last weekend I decided to get out one pack and make some beef stock.
I decided to roast the bones before boiling them as I had heard that imparted such great flavor to beef stock. I threw the bones in a foil lined pyrex into the oven at 500 degrees until things started looking a little browned and sizzly. The browned bones, their meat and accumulated juices went into a soup pot along with half an onion, a few garlic cloves, a celery stick and some
peppercorns. A bunch of hours later this humble start turned into one of the most delicious things to ever come out of my kitchen. I used the same bones with more onion and garlic to make a second batch that was equally tasty. Talk about frugal!One of the tricks to making good tasting bone broth is to skim the foam off the top as it comes to a boil. You need to start with cold water so the pot comes slowly to a boil and the gelatin can seep out of the bones before it sets with the heat. As the stock boils a foam will rise to the top and this needs to come out. It is a protein foam and is made by the same process that makes the foam on ocean waves. If left in the stock for the long simmer the protein will overcook and impart bitter flavors into the stock. Just use a spoon or a wire strainer to get that foam off.
There are two camps in the debate over simmer time for chicken stock. One camp says that after long simmering times, like 12 hours or 24 hours or longer, the minerals from the chicken bones have fully leached into the broth and it is most nutritious. The other camp says that a shorter simmer time gets enough minerals out but doesn't destroy the gelatin. I'm in the short simmer camp for both gelatin and flavor - I find long cooked chicken stock to not have much of the chickeny flavor I am looking for. I usually simmer my chicken stocks for between 4 and 6 hours, sometimes over two days with a cooling period inbetween simmering periods.
Beef broth, on the other hand, both requires and can handle a much longer simmer. My first batch of beef broth simmered for 12 hours the first day, and another 8 the second day. I simply put a lid on the pot, turn off the heat and let the stock sit on the stove overnight. The next day I turn the heat back on, make sure the stock comes to a full boil for a couple min
utes, and then let it simmer away. This may freak out food safety officials, but I figure any bacteria growing in the soup get boiled off the next day. When I am done simmering I make sure to use a quick cooling method like a water bath, to get the stock as cool as possible as quickly as possible. Safety first!I used some of this fantastic broth to make a very simple soup the other night. I sauteed some onions, celery and carrots in goose fat, seasoned with italian seasoning and herbs de provance, added the broth and cooked some egg noodles in the soup. With broth in the fridge or freezer a tasty, nutritious meal is only minutes away. And you can't beat that with a stick.
Thanks to These Days in French Life and Graygoosie for their gorgeous photos!!
Thursday, March 5, 2009
I Had Never Made a Quiche Before
1 prebaked and cooled 9 inch pie crust
1 cup chopped chicken sausage - I had andouille - or cooked spicy sausage
1 1/2 cups chopped curly kale
2 cloves garlic
2 green onions (or a small amount of sliced white onions)
salt, pepper
bacon fat
3 eggs
3/4 cups kefir
3/4 cups half and half (or 1 1/2 cups dairy product of your choice)
1 cup shredded cheese (I used fontina and cheddar)
*Brown the onion and sausage in the bacon fat in a sautee pan. Add the garlic and salt and pepper and sautee another minute. Add the kale and toss and stir to get the fat all over the greens. Cover the pan and turn heat to low, stirring occasionally until kale is wilted and cooked. I deglazed the pan with a little vegetable broth, but water could be used. Cook until the liquid is almost all gone from the pan.
*Combine the eggs and dairy, either with a whisk or in the blender. Salt and pepper appropriately.
*Sprinkle the crust with half the cheese and then lay the cooked kale/sausage mixture in the crust. Pour the egg mixture over the kale and then cover everything with more cheese. I sprinkled a little paprika on top for color.
*Bake 25-30 minutes (mine took more like 35). The recipe says to serve immediately but I prefered the texture and flavor when it was cooled overnight.
I'm imagining the quichy possiblities - spinach and ham, broccoli and bacon, tomato and parmesan... mmmm. Quiche!
Thursday, February 26, 2009
Edible Weeds
I started my journey by learning to identify "garden" plants like raspberries, blackberries, apples, plums and cherries. All of these grow rampant here in Western Oregon and late last summer I collected an abundance of fruit from all of them. From there I
This weekend I went for my first herb walk of the spring. I was out looking to see if the nettles had come up yet and was suprised at how many other little green herbs I found. I can't wait to go back in a few weeks and do some actual harvesting. Everything was too small to harvest this week - you can't harvest little babies! :)
Here's what I found:
Nettles!
Susun Weed considers nettles (Urtica dioica) to be one of the most nourishing herbs. She recommends making an herbal infusion by letting one cup of dried herb steep in a quart of hot water for at least 8 hours. She says that nettle weed "builds energy, strengthens the adrenals, and is said to restore youthful flexibility to blood vessels. A cup of nettle infusion contains 500 milligrams of calcium plus generous amounts of bone-building magnesium, potassium, silicon, boron, and zinc. It is also an excellent source of vitamins A, D, E, and K." Can't really beat that with a stick. I'm going back for nettles again soon!
Melissa!
This herb is called either melissa or lemon balm (or Melissa officinalis if you are into that kind of thing) and has one of the most lovely scents in the plant kingdom. It's in the mint family but has a soft, lemony scent that is perfect in iced tea, ice cream or muddled into your julep in the summer. I've got a big bush of this in my parents backyard, but may harvest some next time I'm up on this trail as well.
I first came across sheep sorrel (Rumex acetosella) as a weed in a garden at the school I worked at. The kids all called it sour grass - a very descriptive name. It grows like a weed (er, is a weed, whatever...) here in Western Oregon and has a lovely lemony tart flavor. I like to munch on it on walks, but it would be a wonderful addition to a salad. Apparently it is also a major constituent of the Essiac formula, which is alleged to have cancer curing properties. Fascinating.
Lanceleaf Plantain (Plantago lanceolata) is a close cousin of common or broad leaf plantain (P. major) and both are alleged to have amazing healing powers. Plantain is edible as a salad herb or a cooked green vegetable and is also supposed to be wonderful for stings, infections or inflamation. I've read more than one account of chewed up plantain leaf stopping the pain and swelling of a bee sting, or of it relieving the itch of poison oak. I look for plantain everywhere I go and remember prime locations. I have a feeling it will be worth it someday.
I also found some chives and a cabbage plant escaped from the a community garden I walked by. I watch the perimeter of that garden all summer for escaped produce :)
Learning to identify edible plants is not hard. Check out plant ID guides at the library and spend some time looking around at what's in your own yard or a park nearby. I'm hoping that wild plants can be a significant addition to my vegetable diet this summer. Why not? They're free for the taking and so full of wonderful wild plant energy and nutrition.