Tuesday, March 31, 2009

Something to Stew Over

I've never really been terribly fond of traditional stew. Part of it is that I'm not a big gravy fan. Maybe that's the jarred gravy my dad always used, but I am not even that excited about homemade gravy. Another part of it is that I've never really liked long cooked meat. I would rather have a dry roasted piece of beef any day! I would even rather have ground meat chili than chili with stew meat. Call me weird, there's just something about the flavor.

This winter, however, I came across two Cook's Illustrated cookbooks that got me thinking about stew in a whole new way. The cookbooks are the Make Ahead recipe collection and Cover and Bake recipe collection. Like all Cook's Illustrated recipes the stew recipes in these books had extensive introductions that covered all the ins and outs of making that recipe. The authors test dozens of different variations to find the perfect recipe. Whenever I have followed a Cook's Illustrated recipe exactly I have ended up with something out of this world spectacular. If you don't know them, check them out!

A couple months ago I made a beef stew from the Cover and Bake book that was fantastic. The meat wasn't overcooked, the gravy was flavorful and just the right texture. It wasn't gummy or oversalted or watery. I knew I needed to give this stew thing another try. And some things just beg to be stewed... like wild boar

The other day, perhaps a payday, I stopped by City Market NW in the rather trendy Alphabet Neighborhood of northwest Portland. City Market NW is the kind of place you should ONLY stop by on pay day, and only then if the credit card bill is not due that same week. It includes outlets for Pastaworks (gourmet fresh pasta, cheeses and antipasti dishes plus wine and import grocery), Viande Meat and Sausage Co (nationally renknown butcher and chartcuterie), Newman's Seafood (can we just say that it doesn't smell like fish) and produce from a local organic farm (who's name I have forgotten.. sorry!). All in a cute little shop with a crazy flower stand out front. When I am independently wealthy I will shop here every day. Until then, only on pay day and with severe reserve and self control :)

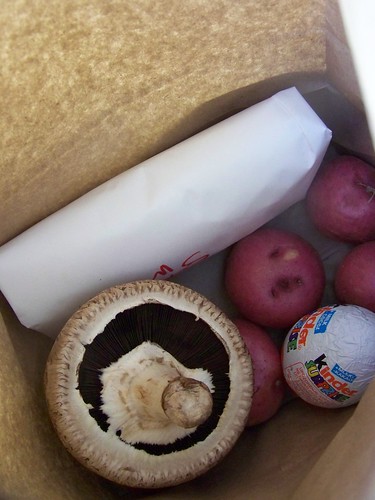
Back to our story. I wandered around, drooled over everything and decided that if I was going to spend a week's worth of gas money on dinner it might as well be good quality meat. I thought about pate, but ended up settling on the wild boar stew meat. A beautiful portabello mushroom, some little red potatoes and a Kinder Surprise Egg rounded out my purchase. What? You've never had a Kinder Surprise Egg? You should... a chocolate shell with a little toy inside. Mine was a whirlygig paper and plastic hippopotamus thing. And it's imported :)


Wild Boar Stew for One (That "One" being Me)

1/2 pound wild boar stew meat (beef would work, or pork, I guess)
1/2 of a medium onion, chopped
2 cloves garlic, pressed
1 4 inch diameter portabello mushroom chopped into 1/2 inch pieces (or maybe 6 white or brown mushrooms, sliced)
1/4 cup chopped carrots
Couple tablespoons red wine
Cooking fat (I bet I used goose fat, you could use lard, coconut oil or olive oil)

Couple tablespoons flour
1/2 tsp or so ground sage
salt and black pepper

Half a dozen small red potatoes
Ground rosemary and sage and black peppercorns plus sea salt
Cooking fat (again, goose, pig or olive as you see fit)

* Combine the flour, sage, salt and pepper on a small plate. Taste to make sure it is seasoned well enough - you want it to taste like more than just flour. Toss the cubes of meat in the flour while you melt a couple tablespoons of cooking fat in a heavy bottomed sauce pan or small dutch oven (I used a 2 quart enameled cast iron and it was the right size). When the fat is hot shake off the excess flour and place chunks of meat in the pot. You want it to be hot enough to hear a sizzle and only enough meat to cover the bottom of the pan without too much touching. When the meat is browned on one side stir or flip the pieces and brown on the other sides. Pull the browned meat out onto a plate and repeat with the rest of the meat.
* When all the meat is browned adjust the fat in the pan - I had to add some but depending on how fatty your meat is you might want to remove some. Add the onions and mushrooms and cook until they are soft and starting to color and get dry again, stirring regularly to keep the onions or "fond" from sticking too much and burning. Add the carrots and cook another minute or two then add the garlic and cook until fragrant. Add another spoonful of the seasoned flour and stir and cook for another minute or two.
* Deglaze the pan with a couple tablespoons of red wine and then add the meat back into the pan. Add stock until it just covers the meat and bring everything to a boil. Turn heat down and simmer for an hour or so, or until the meat is cooked through and the flavors have melded.
* Meanwhile, clean and chop the potatoes into serving sized pieces (I think I quartered mine, but they were quite small) while bringing a pot of water to a boil. Salt the water and cook the potatoes until they are done, but not falling apart soft. Drain in a colander and allow to dry while you heat cooking fat in a cast iron skillet in a 400 degree oven.
* Add the dried off potatoes to the hot fat (use an oven mitt to handle the pan and watch for splatters!). Toss once or twice and put the pan back in the oven. After 10 minutes or so check to see if the potatoes are browned. If they are stir them and season with salt, pepper and ground herbs. Allow to brown on the other side and then pull out of the oven.
* Serve stew in a shallow bowl ladled over the roasted potatoes. Perhaps with a generously buttered slice of wheat bread. Maybe a salad, if you don't want to be a purist. Certainly with more of that red wine.

Yup, with stew like this I might just be a convert. Gravy out of a jar? Blech. Wild boar in homemade beef stock... yes please!


Wednesday, March 25, 2009

Square Foot Gardening


For this week's Real Food Wednesday blog carnival I'll tell you a bit about my gardening experiment. I've been wanting to garden for years but the school/seasonal job year happens to perfectly bisect the growing season year. It's hard to get excited to plant stuff in April and May when you know you are going to be moving in June or July. Luckily for my gardening aspirations I have a "real" adult job this year and no plans of moving anywhere! I am actually going to be planting two gardens this year, one in the little yard at my duplex and a bigger one in my parents' backyard up the street.

Last fall I bought a copy of Mel Bartholomew's All New Square Foot Garden and have been reading it voraciously. Square foot gardening is an intensive planting method using prepared soil (instead of native garden soil and amendments) that is designed for people who want the joy of gardening without the hassle of huge harvests or the hard work of tilling and weeding. As I do more reading about it I see some draw backs, but for the first year of my garden experiment I am willing to give it a try. The basics of square foot gardening include the square foot grid that you plant within and Mel's Mix soil. Both take a little work up front, but I think they will repay serious dividends over the course of the year.

My garden at my parent's house is a 4x6 foot plot that had tiger lilies in it for the last few years. If you ever want to do some hard work, dig out overgrown lilies. I'm afraid I won't enjoy the blooms this year :) I dug the bulbs out and laid in a couple layers of mulch and peat moss and then covered it with about 5 inches of Mel's Mix from the book.

Mel's Mix is a 1:1:1 ratio mixture of vermiculite, peat moss and mixed compost. At first I was put off by the "buy stuff" nature of the Mel's Mix but I decided to go for it. I tried container gardening in a mixture of wood compost, top soil and native garden soil last summer and all my plants starved to death. I was willing to put out some expense to get usable vegetables this year :) I was able to purchase all three of these ingredients with minimal hassle or expense. I purchased a 4 cubic foot bale of compressed peat moss for 10 dollars, 3 one cubic foot bags of compost (steer, chicken and mushroom) for 5 dollars a piece and the 3 cubic foot bag of vermiculite for 50 dollars. The vermiculite is clearly the expensive part of the formula but it provides good structure and air pockets to the soil and really should be a one time investment. In the future I will have a compost system set up so I won't have to buy compost, and that looks like the only thing you have to add in the future anyway.

Over the Mel's Mix I laid my grid. Mel recommends wood lath to form the grid but I happened to have a bunch of broken venetian blinds laying around so made my grid out of that. The square foot gardening method calls for planting a proscribed number of plants in each square foot, alternating what plants are in each square. It's a block planting system instead of a row planting system, but the plants have the same room around them in the end. For instance, you plant 4 lettuce plants in a square which is equivalent to the "thin to 6 inches" instructions on the back of the seed packet.

The other really amazing part of the square foot gardening book is the time tables in the back for when to plant. He lays out a planting schedule based on weeks before or after your local last frost date so you can use the system almost anywhere. Here in Portland, OR our last frost date is in the second week of April so I am already planting some hardy spring plants. I have already planted snow peas, lettuce, turnips, mustard, radishes and onions, and will plant some chard, bok choy, more onions and lettuce, and kale or broccoli before the spring is too much further along.

Later in the summer I will plant tomatoes, cucumbers and zucchini but haven't decided exactly how to fit those into my gardening plans. Mel Batholomew claims you can plant all of those plants in the square foot garden with trellises, but I'm thinking I may use the plot at my house for a less structured garden with more room for each of those big plants.

My next big challenge is protecting the garden. First and foremost I need to protect it from the two big black dogs that share the backyard with my garden. My dad's dog particularly likes to dig but both will tromple right through it given half a chance. Right now I have chicken wire laid over the soil but once things start sprouting I am going to need to change that a bit. I've got some ideas floating around in my head, but we'll see how any of it actually works out :)

I'm dreaming of lettuces and radishes out of the garden, tomatoes warm from the vine and cucumbers plumping in the sun. Spring, however, is wet and long here in the pacific northwest and it will be quite a few months before there are any backyard barbecues featuring garden fresh onions and zucchini. Ya know what though, the rain doesn't seem to bother me quite as much when I know it is watering my garden for me :)

Sunday, March 22, 2009

Blender Batter: Cornbread

You know what's the worst? The absolute pits? When you put stuff in your crock pot in the morning, spend all day thinking about the food you are going to eat when you get home, arrive home only to find that your crock pot didn't cook your food for whatever reason. Sometimes that reason is that your darling boyfriend "forgot" to turn it on like you asked him, sometimes that reason is that your janky house has janky outlets and there was never power to the crock pot. Sometimes you were just in such a rush in the morning that you put everything in but didn't turn the darn thing on. No matter the reason, it totally sucks.

When this happened to me last week I did, at least, have one shining beacon of hope. In addition to putting black beans in the crock pot I had started a batch of Sue Gregg's Blender Batter Cornbread. You knew the blender batter method made great pancakes (because I told you it did and you all ran out and tried it this weekend, right?) but did you know it makes an amazing cornbread too? It does! Sue's recipe calls for whole kernel corn and wheat berries processed the same way as for the blender batter pancakes. I didn't have any wheat berries in the house so I used white flour, which is lower in phytates than whole wheat (if you are really worried about phytates in the corn and wheat then be sure to use wheat the way Sue recommends. Amanda Rose of Rebuild from Depression gives some compelling research results that corn does not have the phytase necessary to actually break down the phytic acid on it's own).

Be sure to check out Sue's recipe and then read on to see how I modified the recipe. Also, a chilling tale of new roommates gone awry, gnashing of teeth and flames. Seriously, keep reading.

Blender Batter Cornbread with Flour

2/3 cup coarse ground polenta
1 cup kefir, buttermilk or thinned yogurt

1/4 cup melted butter
2 eggs

2 tsp baking powder
1 tsp salt
1 cup unbleached white flour

*The night before combine the polenta and the kefir in a bowl. Stir to combine and leave to sit at room temperature over night.

*In the morning (afternoon or after work) pour the corn and kefir into your blender and grind. Again, start slow and once the mixture is making a vortex then allow it to grind for a couple minutes. Add the eggs and blend then add the melted butter while the blender is running.

*Preheat the oven to 350 degrees. In a separate bowl combine the flour, baking powder and salt. Combine the wet ingredients from the blender with the dry ingredients in a medium sized mixing bowl. Stir until they are combined, but still lumpy. You don't want to overmix quick breads or they will be tough.

*Generously grease an 8x8 baking dish and pour the batter in. Cook at 350 for 25-30 minutes or until a knife stuck in the center comes out clean. Serve with lots of butter and honey.

My beans were a bust but the cornbread turned out perfect. It was golden, lightly browned, light textured, deeply corn flavored. I whipped up a soup to eat instead of my beans, cut a piece of cornbread and sat down to dinner. As I was eating my new roommate came into the kitchen and started a pot of water for pasta. I will give him the benefit of the doubt and say our stove is set up strange but all I know is a few minutes later there was a pop like a gunshot. I turned around and the pyrex dish the cornbread had been cooked in was shattered and right before my eyes my beautiful cornbread caught on fire! He had turned the wrong burner on!!

Damage control was quick and some of the cornbread was even salvaged. I was angry and upset for a minute or two (my cornbread!!) and then we got down to the business of digging pyrex shards out of the linoleum. My cornbread! My beautiful cornbread!!

Luckily, I have this awesome recipe, more polenta in the cupboard and my roommate's pyrex dish to cook it all in.

Thursday, March 19, 2009

Blender Batter: Pancakes

I'm very active on a yahoogroup that discusses the book Nourishing Traditions and all things traditional foody and health realted (shout out to DiscussingNT - woot woot!). When people first join the list they invariably ask one of three questions - "How do you do ALL of this??" "How do you make Sauerkraut??" and "Does anyone have a GOOD sprouted or soaked bread recipe??". I've only been blogging for a couple months and feel like I've addressed the first two. Now I'll address the last one.

Most of us in America grew up on some variation of fluffy, sweet, soft bread and pastries. My mom made sure we ate wheat bread, but it was as fluffy as the Wonder Bread my friends ate. And we certainly got bisquick pancakes, doughnuts, and white rice. As I learned more about nutrition I learned of the benefits of whole grains - increased fiber and increased nutrients. Then came Nourishing Traditions and their instructions for soaking or sprouting grains. Whoa - this is getting a bit heavy.

I'll be the first to admit that soaking or sprouting grains before consuming them is low on my priority list. I understand the benefits of reducing anti nutrients, increasing digestability and all of that. It makes perfect sense. Heck, I even believe that grains don't need to be the base of our diet. Humans have only been eating grains for a couple thousand years, compared with meat and vegetables which we have been eating since before we were even humans. That doesn't mean it's easy to implement.

But then I found a recipe that makes it easy. Last year I was introduced to Sue Gregg's blender batter method of making pancakes and waffles. She uses a blender to grind a mix of whole grains and fermented milk into a slurry that becomes the batter to make your pancakes or quick bread. The more I experiment with this technique, the more I love it. I'm going to write out how I make pancakes here, but I highly recommend that you go visit Sue Gregg's site. She has lots of information, her original recipes and links to buy her books (anyone looking to buy me a birthday present? Yeah, email me, I'll send you my address :)

Her site is here: http://www.suegregg.com/

Blender Batter Pancakes

1 cup whole grain*
1 cup kefir, buttermilk or yogurt thinned to the consistency of buttermilk

1 tbs (or more) liquid fat - melted butter or coconut oil, olive oil, etc.
1 egg
1/4 tsp baking soda
1/2 tsp salt
1 tsp baking powder
up to 1 tsp vanilla extract and/or sweetner of your choice (optional)

The night before you want to make pancakes combine the grain and the milk in your blender. Using the pulse button start to grind the mixture. When the mixture starts to make a nice vortex in the middle let it run and grind the grains. Sue has you grind it for a full 3 minutes. I usually don't let my cheap blender run that long continuously and even if it doesn't grind the whole 3 minutes it seems to work just fine. Grind it for as long as you can stand it. If it doesn't make a vortex you can add a little more liquid, but do so sparingly. Chances are you have enough liquid and if you add more your pancake batter will be too loose.

Let the mixture of grain and milk sit on the counter for a couple hours or overnight. If your blender is nicer than mine you can just leave it in the blender jar. Mine leaks at the bottom so I scrape everything into a bowl and let it sit on the counter.

In the morning grind the grain/milk mixture again to loosen everything up. Since I probably didn't grind it a full 3 minutes the night before I give it a good grind first thing in the morning. Add the egg and grind it some more. With the blender running add the melted fat. This keeps the fat from clumping when it hits the colder batter. Add the optional sweetner or vanilla.

When you are ready to cook the pancakes (heat up you cast iron skillet, melt a bunch of coconut oil or butter in it, get everything hot, cook your bacon, etc) add the salt and leaveners. Again, do this while the blender is running to avoid clumping.

Cook your pancakes as usual, being sure to give the first one to the dog. That's traditional, remember? :)

*The cool thing about this recipe is that you can use ANY grain you want. The gluten in wheat is not very important when making pancakes so even if you aren't "gluten free" you can make these that much more healthy by using gluten free grains. I usually use a mix of oats (steel cut or rolled), brown rice (or white), wheat berries, cornmeal, and whatever else I have around. I like adding a tablespoon or more of sesame seeds to the mix and have been known to use my Arrowhead Mills 7 Grain Gluten Free Hot Cereal. Toasted buckwheat, or kasha, makes an amazing pancake! Quinoa, barley, amaranth, kamut, millet - whatever you have or like, use it! Just use one cup total of whatever grains you like.

These pancakes rock. No one would ever guess that they were whole seeds and fermented milk a mere 6 hours before. They generally don't have a "whole grain" texture, are light and fluffy, and incredibly flavorful. You can vary them any number of ways by adding berries or nuts, changing the grains, changing the sweetner and of course changing the toppings. I personally love jam and yogurt, but won't turn down a pancake with butter and maple syrup either.

I recently used this method to make a cornbread and am excited about branching out into other quick breads and muffins. The batter could also make crepes/tortilla-like-wraps if made thinner. I generally make a double batch and freeze the extras for quick breakfasts later on.

I just can't say enough good about this recipe and method. Give it a try, seriously. It's so versatile, and you feel so accomplished. "I used whole grains, soaked them and I can have a real breakfast all week!"

Tuesday, March 17, 2009

Coconut Oil Killed my Stink!

This week's Real Food Wednesday is on natural body care products. This is a topic that I've learned a lot about recently, and feel pretty strongly about. This may be the first in a series of posts, we'll just see how things shake out :)


I have lots of reasons for rejecting commercial body care products. I don't like the chemicals, I don't like the marketing and in general I just don't believe my body needs quite so much "care" as Proctor and Gamble or Walgreens would like me to believe. For years I have been using baking soda and dish soap to do almost all of my household cleaning and this winter redoubled my efforts to remove chemical cleaners from my body cleaning routine as well.

This winter I made the switch to a no-poo method of cleaning my hair. I now use baking soda and apple cider vinegar and my hair looks great! I use only simple soap like Dr. Bronner's or local goats milk soap to clean my body and perfume free dish soap in the kitchen. Since I don't color, style or spray my hair I didn't have to worry about products for those "needs." The last hold out was deodorant.

I've spent a number of years accepting, and even cultivating, my "dirty hippy" persona :) I don't shave, I don't gel my hair, and only recently allowed myself to be held down to have my eyebrows plucked. I'm about as crunchy as you can get this side of dreads, patchwork corduroy or patchouli stank. That doesn't mean I particularly enjoy smelling like B.O. I gave up regular deodorant years ago because of aluminum and other health concerns but never felt my other options were particularly useful. I love all that Tom's of Maine does for this world, but controlling stink is not something they do well. I continued to use their deodorant for years because then at least I smelled like I was trying to control the odor but I certainly wasn't eliminating it.

Over the last few months I have kept running into blogs or flickr posts about homemade deodorant. I figured the universe was trying to tell me something so I did a little more research. Turns out, baking soda and coconut oil, two of my pantry staples that I already knew and loved the benefits of, were the base of most homemade deodorants. Baking soda is an moisture absorber and odor eliminator while coconut oil has some serious anti-microbial properties, as well as being a moisturizer and smelling wonderful. I saw that some folks had trouble with irritation when they used either baking soda alone or in high proportion to coconut oil and one recipe combined the baking soda with cornstarch or arrowroot powder. I took that recipe, added some tea tree and rosewood essential oils for their anti-microbial properties and amazing smell, and ended up with some amazing natural deodorant.

I've been using it for a couple weeks now and not only has it completely eliminated the unpleasant body odor on the days I use it (and leave a faint, pleasant natural odor) but it even has eliminated unpleasant odor on the days I don't use it! Wow!

Homemade Deodorant
1/2 cup virgin coconut oil
4 tbs baking soda
2 tbs cornstarch or arrowroot powder, or more baking soda, or none of the above
2 drops tea tree essential oil*
6 drop rosewood essential oil*

  • Melt the coconut oil gently in a jar with about 1 cup volume (I used wide mouth half pint jar and think it's a great size) either under hot tap water or in a gentle water bath. Coconut oil melts at about 75 degrees Fahrenheit so hot tap water is all you need.
  • When the coconut oil is completely liquid stir in the baking soda and corn starch one spoonful at a time. Stir well and make sure to scrape the powders up from the bottom of the jar. Add the essential oils and stir to combine.
  • As the concoction cools to room temperature stir it occasionally to redistribute the powders, which will sink in the liquid oil. There will be a magic moment when the oil is still liquid enough to stir but solid enough to keep the powder in suspension - find that moment and stir like the devil! If you are doing this during the heat of the summer when room temperature is above 75 use the fridge to cool the deodorant.
  • Allow the emulsified oil to cool all the way to room temperature (it will probably want to be kept in the fridge in the summer to keep the powders emulsified). To use scrape a pea sized amount onto your finger and rub into your underarms. Your body heat quickly melts the ball of deodorant and you can smooth it all in there. I used a fork to break up the mass of oil so I could easily scrape out the right amount.

*I actually used 1 drop rosemary and 2 drops sweet orange in addition to the rosewood and tea tree, but don't recommend going out and buying those if you don't want to. Any essential oil or blend of oils that you like would work. Make sure they are high quality, natural oils. Go to the essential oil shelf of your local health food store and sniff away. Watch the prices though - some natural oils go for 5 dollars for a small bottle, other for 30 dollars.

I really, really like this deodorant. I won't have to make more for a long time - months at least - but when I do I will probably eliminate the cornstarch all together, and reduce the amount of baking soda even more. The first night I made it I didn't know to stir as it cooled so for the first few days I was using only scented coconut oil. It seemed to work just fine.

There are lots of reasons to avoid buying personal care products at the store. Money is a big one and so is the toxic chemicals used to produce those products. If you didn't read the article I linked to about marketing beauty products to women you should - it's bombastic and may be offensive, but so is how women (and men, to some extent) are seen by the people selling everything from shampoo to toothpaste to tampons. I don't have to support any of that when I make my own out of food products like this. Whatever I can do to support my health and a non-consumeristic culture is more than many are doing. And next time someone asks me what that tantalizing scent is I can say "my armpits."

Thursday, March 12, 2009

Bone Soup

I have been making chicken broth for a couple years now and preach the gospel of bone broth every chance I get. Broth made from animal bones and connective tissue is full of healthful gelatin, minerals and - most importantly - flavor!

There is a reason chicken soup is a food for sick people throughout the world. Studies are showing that the gelatin and other proteins found in properly made bone broth are essential in bone, joint and skin health as well as digestive health. In fact, bone broth is the base of the very popular GAPS diet for healing digestive and related psychological disorders. Every Jewish grandmother knows that chicken soup heals, and as is usually true of grandmother's wisdom, science is finally coming around.

Chicken broth is the most common homemade broth (in my kitchen and beyond) because we tend to collect more chicken bones than beef or lamb bones but I recently ventured into the land of beef stock. Last fall in a fit of panic over the economy and weather I went to a local discount grocery warehouse store and spent 75 dollars on food, including two packs of meaty beef "soup bones". I wrapped them up, threw them in the freezer and haven't looked at them since. Finally this last weekend I decided to get out one pack and make some beef stock.

I decided to roast the bones before boiling them as I had heard that imparted such great flavor to beef stock. I threw the bones in a foil lined pyrex into the oven at 500 degrees until things started looking a little browned and sizzly. The browned bones, their meat and accumulated juices went into a soup pot along with half an onion, a few garlic cloves, a celery stick and some peppercorns. A bunch of hours later this humble start turned into one of the most delicious things to ever come out of my kitchen. I used the same bones with more onion and garlic to make a second batch that was equally tasty. Talk about frugal!

One of the tricks to making good tasting bone broth is to skim the foam off the top as it comes to a boil. You need to start with cold water so the pot comes slowly to a boil and the gelatin can seep out of the bones before it sets with the heat. As the stock boils a foam will rise to the top and this needs to come out. It is a protein foam and is made by the same process that makes the foam on ocean waves. If left in the stock for the long simmer the protein will overcook and impart bitter flavors into the stock. Just use a spoon or a wire strainer to get that foam off.

There are two camps in the debate over simmer time for chicken stock. One camp says that after long simmering times, like 12 hours or 24 hours or longer, the minerals from the chicken bones have fully leached into the broth and it is most nutritious. The other camp says that a shorter simmer time gets enough minerals out but doesn't destroy the gelatin. I'm in the short simmer camp for both gelatin and flavor - I find long cooked chicken stock to not have much of the chickeny flavor I am looking for. I usually simmer my chicken stocks for between 4 and 6 hours, sometimes over two days with a cooling period inbetween simmering periods.

Beef broth, on the other hand, both requires and can handle a much longer simmer. My first batch of beef broth simmered for 12 hours the first day, and another 8 the second day. I simply put a lid on the pot, turn off the heat and let the stock sit on the stove overnight. The next day I turn the heat back on, make sure the stock comes to a full boil for a couple minutes, and then let it simmer away. This may freak out food safety officials, but I figure any bacteria growing in the soup get boiled off the next day. When I am done simmering I make sure to use a quick cooling method like a water bath, to get the stock as cool as possible as quickly as possible. Safety first!

I used some of this fantastic broth to make a very simple soup the other night. I sauteed some onions, celery and carrots in goose fat, seasoned with italian seasoning and herbs de provance, added the broth and cooked some egg noodles in the soup. With broth in the fridge or freezer a tasty, nutritious meal is only minutes away. And you can't beat that with a stick.


Thanks to These Days in French Life and Graygoosie for their gorgeous photos!!

Thursday, March 5, 2009

I Had Never Made a Quiche Before

I had never made a quiche before, but now that I have I will certainly make more! It was a very easy and tasty week night meal. This recipe is based on Julia Child's spinach quiche, but changed around a little bit. I used a store bought crust made with non-hydrogenated oil and organic flour, which I felt was a fine compromise.

Sausage and Kale Quiche

1 prebaked and cooled 9 inch pie crust

1 cup chopped chicken sausage - I had andouille - or cooked spicy sausage
1 1/2 cups chopped curly kale
2 cloves garlic
2 green onions (or a small amount of sliced white onions)
salt, pepper
bacon fat

3 eggs
3/4 cups kefir
3/4 cups half and half (or 1 1/2 cups dairy product of your choice)
1 cup shredded cheese (I used fontina and cheddar)

*Brown the onion and sausage in the bacon fat in a sautee pan. Add the garlic and salt and pepper and sautee another minute. Add the kale and toss and stir to get the fat all over the greens. Cover the pan and turn heat to low, stirring occasionally until kale is wilted and cooked. I deglazed the pan with a little vegetable broth, but water could be used. Cook until the liquid is almost all gone from the pan.
*Combine the eggs and dairy, either with a whisk or in the blender. Salt and pepper appropriately.
*Sprinkle the crust with half the cheese and then lay the cooked kale/sausage mixture in the crust. Pour the egg mixture over the kale and then cover everything with more cheese. I sprinkled a little paprika on top for color.
*Bake 25-30 minutes (mine took more like 35). The recipe says to serve immediately but I prefered the texture and flavor when it was cooled overnight.

I'm imagining the quichy possiblities - spinach and ham, broccoli and bacon, tomato and parmesan... mmmm. Quiche!

Thursday, February 26, 2009

Edible Weeds

Last summer I spent an amazing amount of time learning about plants that produce edible leaves or fruit. I'd always been an animal kid, more interested in dogs and ponies and pigeons than in what was growing in the garden. I was also, however, a food person and as the years have passed I have come to have great respect for the plants that provide me food. Someday I'll have animals that provide me food, but until then I will focus on edible plants. And what easier plants to get food from than the ones you don't have to plant or tend?

I started my journey by learning to identify "garden" plants like raspberries, blackberries, apples, plums and cherries. All of these grow rampant here in Western Oregon and late last summer I collected an abundance of fruit from all of them. From there I started learning about garden weeds, and have started doing some reading on wilder weeds. One of the best resources on weeds, wildcrafting and herbal medicine is Susun Weed. Reading her Ezine and articles have been inspiring and I would love someday to be able to take one of her correspondence classes. There are lots of other great herb blogs, websites, books and classes out there. If you are interested in this then be sure to do you research. There are lots of safe, edible plants to be found out there but plants generally don't want you to eat them. Many have come up with some pretty clever ways to keep you from eating them more than once.

This weekend I went for my first herb walk of the spring. I was out looking to see if the nettles had come up yet and was suprised at how many other little green herbs I found. I can't wait to go back in a few weeks and do some actual harvesting. Everything was too small to harvest this week - you can't harvest little babies! :)

Here's what I found:

Nettles!

Susun Weed considers nettles (Urtica dioica) to be one of the most nourishing herbs. She recommends making an herbal infusion by letting one cup of dried herb steep in a quart of hot water for at least 8 hours. She says that nettle weed "builds energy, strengthens the adrenals, and is said to restore youthful flexibility to blood vessels. A cup of nettle infusion contains 500 milligrams of calcium plus generous amounts of bone-building magnesium, potassium, silicon, boron, and zinc. It is also an excellent source of vitamins A, D, E, and K." Can't really beat that with a stick. I'm going back for nettles again soon!

Melissa!

This herb is called either melissa or lemon balm (or Melissa officinalis if you are into that kind of thing) and has one of the most lovely scents in the plant kingdom. It's in the mint family but has a soft, lemony scent that is perfect in iced tea, ice cream or muddled into your julep in the summer. I've got a big bush of this in my parents backyard, but may harvest some next time I'm up on this trail as well.


Sheep Sorrel!

I first came across sheep sorrel (Rumex acetosella) as a weed in a garden at the school I worked at. The kids all called it sour grass - a very descriptive name. It grows like a weed (er, is a weed, whatever...) here in Western Oregon and has a lovely lemony tart flavor. I like to munch on it on walks, but it would be a wonderful addition to a salad. Apparently it is also a major constituent of the Essiac formula, which is alleged to have cancer curing properties. Fascinating.


Plantain!

Lanceleaf Plantain (Plantago lanceolata) is a close cousin of common or broad leaf plantain (P. major) and both are alleged to have amazing healing powers. Plantain is edible as a salad herb or a cooked green vegetable and is also supposed to be wonderful for stings, infections or inflamation. I've read more than one account of chewed up plantain leaf stopping the pain and swelling of a bee sting, or of it relieving the itch of poison oak. I look for plantain everywhere I go and remember prime locations. I have a feeling it will be worth it someday.

I also found some chives and a cabbage plant escaped from the a community garden I walked by. I watch the perimeter of that garden all summer for escaped produce :)

Learning to identify edible plants is not hard. Check out plant ID guides at the library and spend some time looking around at what's in your own yard or a park nearby. I'm hoping that wild plants can be a significant addition to my vegetable diet this summer. Why not? They're free for the taking and so full of wonderful wild plant energy and nutrition.

Wednesday, February 18, 2009

My Favorite Coconut Recipe

The Real Food Wednesday topic this week is healthy coconut recipes. When I was a kid I thought I didn't like the taste of coconut, but it turns out that it's actually the texture of coconut flakes that I don't like. Since discovering coconut milk and coconut oil I have come to really love the flavor of coconuts. I use it for lots of things in my kitchen (which I will share with you here) but, as any of you who have read my blog before know, my all time favorite recipe with coconut in it is - yup, you guessed it. Thai Yellow Curry. Today I'll share with you my two home made thai yellow curry recipes. Both are delicious.
For more information on why coconut is so healthful (and it is) check out these links.

The Weston A Price Foundation article on coconut oil.

Bruce Fife's page on coconut - note, he sells coconut products. Not that his research is bad, just that he's got a reason for you to love the stuff.

Kelly the Kitchen Kop's blog on coconut.

Practical Nourishment - a blog I just found and intend to read often!

I always have coconut milk and coconut oil in my kitchen. I use expeller pressed coconut oil from Omega Nutrition anywhere I would use vegetable oil (which I don't use because it is so high in polyunsaturated fats which are not very healthy for you) because it can be heated to medium/high temperatures and doesn't add a coconutty flavor. Here are a few of my other favorite uses for coconut oil and milk.

*Coconut milk kefir. Just drop kefir grains in coconut milk for a sweet, sour, tangy non-dairy fermented treat. Kefir grains will not grow in coconut milk, but they survive just fine as long as they get switched back into dairy milk. SN of Everything Free Eating propogates kefir grains in dairy milk and then uses them in coconut milk until they die to make kefir for her dairy sensitive kids.

* Coconut oil mixed with butter on popcorn. Oooohhhmmmyyyyyyuuuummmmm. Yeah. It's that good.

* Coconut-chocolate bark made with coconut oil, cocoa powder or melted chocolate and chopped nuts. It's candy, and it's good for you, I swear. I've never added butter or peanut butter, but here's a recipe that is worth trying over at Practical Nourishment.

* Jamacian Beans and Rice. A one pot dish adapted from the recipe in Nourishing Traditions. So, so good!

* Sometimes I eat a spoonful of coconut oil off a spoon to tide me over until I can eat real food. It's amazing how well it works at staving off hunger.

And now onto the meat and potatoes, er, coconut milk and chicken. As you can see from my Mission: Yellow Curry PDX entries I love Thai yellow curry. I love how complex it is, and how filling and soothing. It's wonderful for a hang over, not that I know anything about that sort of thing. Amazingly, it's super easy to make at home as well. Remember, a curry is just a stew. Add what you have, subtract what you don't and adjust the amounts or consistency to suit your tastes or the number of folks you are feeding.

You do need one special ingredient to make Thai curry and that is Thai curry paste. Indian curry powder will not do. My favorite brand, and one that a friend who actually lived in Thailand used, is Mae Ploy. I buy it locally at an asian supermarket, but have seen it at other grocery stores in town. You can also get it here on Amazon. Or just google around, maybe some other, slightly less giant/evil corporation will ship it to your house. Mae Ploy makes other flavors of curry paste and all can be substituted for the yellow but the all have slightly different tastes. Yellow curry is the mildest as far as heat goes, so if you have gringo taste buds be careful!

This is the Thai curry that my friend Rosie taught me to make my freshman year of college. It changed my world. Maybe it will change yours as well.

Thai Curry at Home
* 1-2 tbs virgin coconut oil or flavorless cooking fat
* 1/2 -1 yellow onion, sliced or chopped coarsely
* 1-2 cloves garlic, sliced or minced
* minced ginger (I would use about 1 tbs minced, but if thats too much for you,use less)
* chile flakes (optional)
* 3 or 4 tbs Mae Ploy Thai Yellow Curry Paste
* 1 14 oz can coconut milk
* 2 cups water or chicken stock or a mix
* 2 tsp soy sauce
* 1-3 tsp Thai fish sauce
* 2 frozen chicken breasts or equivalent in cooked meat or cubed tofu (I don't recommend it, but that's how I was taught - it's your dinner :)
* approx 2 cups of any of the following, or a mix: yellow, red or purple potato or sweet potato, washed and chopped and/or chopped carrots and/or chopped eggplant or zucchini and/or cauliflower florets, green beans, frozen peas
* Fresh limes for juice
* a spoonful of brown sugar (very optional)

1. Melt fat in a largeish sauce pot (mine is probably 3 quarts.. not quite a soup pot) and add onions (and carrots if using). Rosie taught me to slice the onions longitudinally, and I still like to do it that way for curry. It doesn't really matter though. Cook over medium heat until transluscent. Add ginger and garlic and cook until fragrant (add chile flakes now, but don't unless you know how spicy your curry paste is). Add curry paste to the cooked vegetables and mash, mix and fry until quite fragrant.

2. Add coconut milk and stir to combine paste in with the coconut milk. Add potatoes (sweet potatoes/cauliflower/other hard veggies or eggplant) and chicken (or tofu, or not) to the pot. Add soy sauce, fish sauce and chicken broth and water to barely cover the contents. You can use chicken broth or water. Bring to a boil, lower heat and let simmer until potatoes are tender and chicken is cooked through. Add soft vegetables like green beans, zucchini or frozen peas later in the cooking process so they don't get too mushy.

3. Add a little lime juice to the curry and taste for seasonings. Adding a little bit of brown sugar will mellow the heat a bit. Soy sauce will deepen the flavor. Hot sauce will up the heat. Serve over rice, and enjoy!

I've also made this thai curry recipe from A Year of Crockpotting in my Rival crock pot. I used Mae Ploy curry paste instead of the chili paste it calls for and it was delicious. Here's my write up over at Recipezaar. In any of these recipes you can adjust the amount of hot sauce or chile flakes, curry paste, sugar, soy sauce or fish sauce to your own tastes. I've taken to adding a little bit of turmeric to the sauce too, to counteract the dulling effect of the soy sauce on the color of the curry. Oh, and some places add basil or cilantro to their curry. You might like that.

Coconut milk and oil are amazingly tasty and healthful food products. It is worth perfecting a few recipes to get those healthful products into your repertoire. And pretty soon you'll be sneaking spoonfuls of coconut oil late at night like the rest of us.

P.S. My lunchbox is a Laptop Lunchbox (www.laptoplunches.com). You can see more of my photos by clicking on the photos and viewing my flickr streams.

Friday, February 13, 2009

Mission: Yellow Curry PDX 003

I work in the Lloyd District of Portland and there are a lot of restaurants around here. I am always on the lookout for new or previously missed Thai places as I drive or walk around. A couple weeks ago I spotted a place on Broadway at 14th that I had never seen before and promptly ordered their yellow curry. It was amazing, and today I went back for round two. Chai Yo.

Chai Yo
1411 NE Broadway, Portland OR
They don't have a website but their phone number is 503 287 0500

What I Ordered:
Lunch special yellow curry with chicken, medium spicy.

Overall Curry Rating: 5

Service: 5
The restaurant is in a convereted old house and is beautiful inside. A little more white tablecloth than many Thai places. I called my order in today but last time I ordered and waited. Both times the service was prompt, friendly and accurate.

Presentation/Packaging: 5
The lunch special curry came in a pint sized plastic container with a lid with the rice in a separate to-go container. No leaks or spills or anything. Perfect.
Oh - there was a bit of a red oilslick on top of the curry by the time I got it back to my office to eat. This doesn't bother me, but it might bother some.

Portion Size/Pricing: 4
6.95 for the lunch special. It was a goodly sized meal, but none for leftovers. Well, maybe that COULD have been two meals, but this is curry for pete's sake. I blog about the stuff, I love it. I'm not going to say no :)

Flavor Complexity: 5
This is some of the most interesting and different yellow curry I've had in Portland. It is redder in color than most other restaurants, and part of that may be the spice level. When you say medium, they make it medium not the "you might be able to taste a little spice" medium of most Thai places in Portland. Other than that it has a great saltyness and you can detect fishy flavors every once in a while. Lemongrass pops out occasionally but this cook doesn't lean on the sweet like so many others do. This place is worth going to just for the experience of eating this curry :)

Overall Flavor: 4
As noted, it's a bit spicy. I actually got a little sweaty and lightheaded on the medium spice, so order accordingly. The potatoes and carrots were cooked through, and they gave me plenty of rice.

Anything Else I Ordered: n/a
I didn't get anything else this time, but last time I ordered their special avocado spring rolls. If you've never tasted melty hot avocado in crispy fried won ton skin you are missing out!

Last Thoughts:
Chai Yo has a mighty fine curry. I can't wait to have an excuse to go there sometim and try some of their other dishes. With the care and complexity they bring to their curry I can't help but be excited for their stir fry and noodle dishes!

Thursday, February 12, 2009

Summer, Preserved

This last summer was the first year I made a real effort to preserve local produce for the winter. It's not that I had never wanted to before, I just hadn't had the motivation or shelf space to really go for it. Summer 2008 was a flury of activity - picking, harvesting, canning, drying, packaging and enjoying. All of this in addition to working a 40 hour job, doing the daily cooking and walking the dog. Oh, and seeing friends occasionally and sleeping. By the end of the summer I was tired and felt a real kinship with the falling leaves. I wanted to fall and let myself decompose during the winter after a hard summers work.

Well, it's winter now and decomposing is something I'm doing a lot of. Do you even know how many great movies there are on Netflix? But I do make it up off the couch and into the kitchen occasionally and my favorite meals lately have included the fruits of my summer labor. There is something magical about opening a jar you put up months ago and being transported back to that time and place. I am totally sold on this food preservation thing if for no other reason than the flavor.

But there are, of course, a myriad of other reasons. I have tomatoes in my pantry that I bought for a dollar a pound and canned myself. I spent less money than I would have on organic canned tomatoes AND I know exactly where the 'maters came from. They were not shipped across the country, or handled by unknown, underpaid workers who don't really care about my health and well being. They were handled by the farmer and by me. Only.

I also have a fair amount of wild or "feral" plant life in my pantry. All of my berry preserves and a couple treasured jars of plum sauce came from plants running their own lives in local parks. Sandor Katz talks about wild energy of wild plants and how eating them can infuse that natural, uncultivated wildness into your own life. I've been watching those plum trees for years and ended up with about 15 pounds of plums in one evening of harvesting. I recently discovered the dried plums I made from some of that fruit hiding in the back of my pantry. They are delicious beyond what anyone would expect a prune to be.

Another great joy of preserving food is having the ability to trade or give it away. I went to visit friends in Southern Oregon last weekend and brought with me a selection of jars from my pantry. One family got applesauce and hot pepper jelly, another plum sauce and blackberry jam. I was able to trade my blackberry jam with another friend for her wild blueberry jam. Both are delicious, and it's all the more exciting to spread a bit of the Southern Oregon mountains on my toast, knowing my dear friend's energy is in it as well. I spent no money on Christmas presents this year either, I just gave away jam.

I recently dug some roasted red peppers out of the freezer to add to my February First Red Soup. My boyfriend brought these peppers home from a U-Pick farm in early September when our dealing-with-food energy reserves were getting low. They looked pleasant enough, even if there were vast quantities of them. And then someone cut into one. Holy moly! We started refering to them as the devil horn peppers. Never kiss a man who has been chopping peppers, not even if he swears he didn't eat any. You will get capsaicin on your face and it will be painful. We made hot sauce, red pepper jelly, and hot relish. We dried them and gave them away and still there were more in the box! Finally I threw the last of them in a baking dish with the last of the tomatoes, some olive oil and some garlic and roasted it until they were soft and a bit charred here and there. I put the fiery goo into the freezer and said good riddance.

Here is this years rendition of my traditional red soup that I make every February First. The roasted chiles added a wonderful kick, and I was glad to welcome them back to the table.

February First Red Soup To Warm the Belly and the Soul
2009 Version

*7 cups homemade chicken broth and/or water
*1/2 cup roasted red peppers
*1 cup red lentils
*1/2 onion, diced
*3 cloves of garlic, sliced
*1 tbs cider vinegar or wine
*cooking oil (goose grease, coconut oil, or whatever you like)
*mustard seed (about a tsp), curry powder (maybe 1/2 a tsp), seasoned salt, pepper and turmeric to taste/color

*In a 4 quart pot warm/defrost the chicken broth and roasted peppers. Puree in the blender once liquid, if you choose. Bring to a boil and add the lentils. Taste the liquid for salt and adjust as necessary. Once boiling drop the heat to a simmer and allow to cook until the lentils are disintegrating.
*In a separate pot or sautee pan heat the cooking oil and the mustard seed. After a minute or two add the onions and curry powder, salt and pepper and stir. When the onions are soft add the garlic and sautee another minute or until fragrant. Add some turmeric at this time if you would like.
*Deglaze the onion pan with the vinegar, stir to get all the browned bits up and pour the vegetables into the pot of lentils. Taste and adjust seasoning and simmer another couple minutes to combine the flavors.
*Serve with curried or turmericked sour cream and red bell peppers as garnish.

Have you ever done any food preserving? What is your favorite part of the process? Are you delighting in any out-of-season-from-your-pantry goodies this winter?


Thursday, February 5, 2009

Mission: Yellow Curry PDX Entry 002

Entry two in the log of my goal to eat yellow curry at every Thai restaurant in Portland. This time I went straight for the big guns - my favorite Thai place in SW Portland. It may seem like a long way to drive for some, but it's right around the corner from my house... and it's good. Thai Roses.

Thai Roses Cuisine

6840 SW Beaverton Hillsdale Highway - and yes, that is a Portland address.
http://www.thairosescuisine.com/

What I ordered:
Out to dinner with a friend so we got yellow curry, medium with chicken, pumpkin curry with chicken, spicy eggplant with pork and both steamed and sticky rice.

Overall Curry Rating: 5

Service: 5
Despite having gotten take out there a number of times this was the first time I ever had a sit down meal there. Lovely Thai themed decor and a friendly wait staff. They were out of the special we ordered but the waitress was very helpful and apologetic. Someday I'll have a meal at one of their outdoor tables. They're kind of in the parking lot, but they've put in a lot of plants to make it seem more secluded. No complaints on service.

Presentation/Packaging: 4
They used kind of modern, square bowls and plates to serve the food and everything came with a cute little carrot flower garnish. The sticky rice came in a super cool wicker basket.

Portion Size and Price: 4
8.95 for the dinner sized curry with chicken. I'm OK with that.

Flavor complexity: 4
Sweet and salty and pungent. I love Thai Roses' curry! I didn't like the flavor of the pumpkin curry as much but it did have basil leaves in it reminding me that I like that flavor in yellow curry a lot. I wonder if I would have missed the basil if we didn't have the other curry to compare and contrast.

Overall flavor: 4
It was wonderful. The potatoes were cooked through but not mushy, ditto on the carrots. The onion still had some crunch and onion flavor to it, and we even got bell peppers! I could taste a little fish sauce in the curry, but not overwhelmingly so. Could have been a little spicier, but it was very very good.

Anything else I ordered: 3 and 5
The pumpkin curry was a bit of a disappointment. The "pumpkin" was actually squash and it was a little dry and not terribly flavorful. Even with the basil it wasn't quite as tasty of a curry sauce. The spicy eggplant, on the other hand, was unbelievable. I wanted to lick the sauce off the plate after we had scarfed all the eggplant and pork down. I settled for dabbing balls of sticky rice in it. The eggplant were buttery and soft and the sauce garlicky, basily and soy saucey. They used sliced pork which I like, but I've had it elsewhere with ground pork and I think I like that even better. Either way, spicy eggplant rocks! Oh - and it was hardly spicy. Next time I might order that hot instead of medium.

Last thoughts:
It may be the forgotten SW, but it's worth a drive out there. There's a New Seasons around the corner so you can pretend like you are grouping errands together. Everything I've had from these guys has been great and they are always friendly and sweet. I love Thai Roses!

Wednesday, February 4, 2009

Kraut 101

I've become known in some circles as a bit of a fermentation guru. I'm no Sandor Katz, but I've done a fair amount of pickling and have a pretty decent understanding of the science of fermentation. I have been asked time and time again for help with the basics of making sauerkraut and was disappointed with some of the other kraut recipes out there. I developed this little tutorial to help the beginner kraut maker. I think it's easy, and I know it works. Give it a try.

At it's most basic sauerkraut is cabbage and salt, left to ferment into a tangy condiment. The fermentation is completed by a wide variety of bacteria that turn the sugar in the cabbage into acid that in turn preserves the cabbage from spoilage. The live bacteria in unheated sauerkraut provide immense benefit when eaten including better digestion, increased gut health and an immune system boost. I recently read that the healthy bacteria that live on your skin and in your gut outnumber your body cells 10 to 1 - doesn't it make sense to make sure they are the right kind of bacteria?

Here are my instructions for making one quart of jar fermented sauerkraut. This is a great size to start with because it is big enough for everyone to try it a couple times, but not enough that you feel overwhelmed. After your first batch, make a second and try some variations. I'll list some of those down at the bottom.

Phase one: Shopping
1. Find good quality, organic green or purple head cabbage. Look at the grocery store or at farmers markets. Even non-organic ones will ferment just fine, but buy organic if you can. One 8 inch diameter head will be more than enough, but it's not a bad idea to pick up more than you think you'll need. You can use leftovers in a recipe like this soup from Nourishin Days. Weigh your cabbage at the grocery store and remember this number.
2. Buy good quality sea salt. I use Real Salt and highly recommend it because it is "real" salt with micronutrients, but isn't going to break the bank either.


Phase two: Cleaning and Chopping
1. Get a quart size mason jar with a lid. You can either buy 6 or 12 of them new with lids, or find one at a thrift store and buy new lids and rings at the grocery store. You might even have some at home already. Wash it well with soap and hot water.
2. Core and chop your cabbage. Commercial kraut is often made with really finely shredded cabbage. I prefer a little bigger shreds.. more or less as small as I can get them with a knife.
3. As you chop your cabbage stuff it into the jar.. with no salt.. this is just for measuring. Don't pound it in, just stuff it as stuffed as you can get it. When the jar is full pull the cabbage out into the biggest mixing bowl (or a big cooking pot) you have. Add another handful or two of shredded cabbage.

Phase three: Salting and Packing
1. Remember how much your head of cabbage weighed at the grocery store? Do a little mental math estimating how much of the cabbage you used, and multiply that by 2 tsp per pound. For example, your cabbage weighed 2 pounds and you used 3/4 of the head. You used 1 1/2 pounds of cabbage so you need 3 tsp of salt. Figure out how much salt you need and sprinkle that over the cabbage. No need for a calculator here, just guestimate.
2. Toss the cabbage and the salt with your hands, squeezing and crunching the cabbage. You should start to see some liquid coming out of the cabbage. Keep kneading and squeezing, thinking about how yummy and healthy this kraut is going to be and how much you love your family for a couple minutes. Alternatively, you could pound the kraut with a wooden pounder or meat tenderizer for a shorter period of time like Jungleen is doing in this photo from Cheeseslave. Either way, the point is to allow the salt to draw the liquid out of the cabbage. Don't give yourself carpal tunnel syndrome, but do allow the cabbage to get wet.
3. Taste the cabbage.. it should be distinctly salty. If it is pleasantly salty, add some more salt. If it makes you want to gag add some more shredded cabbage :)
4. Rinse your hands off and start packing the jar. Use a wooden spoon or wooden meat pounder or small ladle to help you really pack the cabbage into the jar. You want to push any air bubbles out. Pack it in a small amount at a time until the cabbage is within 1/2 an inch of the bottom of the threads of the jar.
5. Push on the kraut one last time. If liquid isn't rising above the level of the cabbage then make a brine of about 1 tsp of salt per cup of water (this should also be too salty to be pleasant but not salty enough to make you gag). Slowly pour a little of this over the cabbage, giving it time to sink in, until it is at or above the level of the cabbage.
6. Screw the lid on tight and put in a warmish place in your kitchen. On top of the fridge, the cupboard above the microwave, etc. Do the dishes and leave the cabbage for the day.

Phase Four: Fermenting and Ageing
1. The next day, open the lid of the jar. I recommend doing this over the sink. Did the jar "pop" or fizz when you opened it? If not, that's OK. Taste the kraut. Put the lid back on and put it back in the warm spot.
2. Repeat the last step every day until it truly is popping of fizzing. Taste it again, and then put the lid back on and put that jar in the fridge.
3. Let it sit for at least one more week and then test again. Sour yet? No, let it go anothe week. In the fridge this stuff will last for weeks and months and just get sourer and sourer. Most likely after 2 weeks in the fridge it will be quite sour, but since you've been tasting it the whole time you know what it's like and when you are going to enjoy eating it. I recently found 6 month old kraut in my fridge and it was sour like vinegar pickles. The salty cabbage will eventually get sour, you just need to give it lots and lots and lots of time if thats what you want.

Phase Five: Making the next batch...
Repeat from the beginning, adding some of your sauerkraut juice to the cabbage as your are packing it or instead of the brine.

Once you get the hang of this kraut method you can start making variations. Adding caraway or juniper berries is pretty traditional, as is sliced or grated turnips or carrots. Other vegetable or seasoning options are as limitless as your imagination. Try onions, garlic, seaweed, greens like kale or brussels sprouts, roots like burdock, horseradish or beets. Try mustard seed, dill, curry or hot peppers of some sort. If you add garlic, ginger, chiles and onion you have kim chi but if you use oregano, chiles and cumin you have cortido. I recently made an apple cranberry sauerkraut that is so wonderful. Experiment, it's your kraut!

Please feel free to post comments with your kraut questions, your kraut experiences and your favorite flavor variations. Your question may end up in my future post, Kraut FAQ :)

Friday, January 30, 2009

Mission: Yellow Curry PDX, Entry 001

I have a goal to eat Thai yellow curry in every Thai restaurant in Portland, Oregon. This may be a herculean feat considering Yahoo local lists at least 116 Thai restaurants in Portland, but I'm going to try. And considering I could eat thai yellow curry once or twice a week, every week, it will be a pleasant challenge.

I've decided to get serious about this goal and start recording my findings. This blog seems like a perfect place to do that first, because it is convenient for me, and also because thai food usually falls within the realm of real food. Thai food is chok full of vegetables, small amounts of meat and seafood, healthy spices and herbs and good fats like coconut milk and peanuts. Fish sauce, a wonderfully nutritious condiment, is almost ubiquitious in Thai cooking. It is also relatively easy to get gluten free meals at thai restaurants becaue of the use of rice and rice noodles (though I would certainly talk to a waiter about possible cross contamination if that is an issue for you). Thai restaurants in America certainly use polyunsaturated vegetable oil for their stir frying and deep frying but if you are good about using healthy fats at home you can probably budget for the occasional Thai meal. If you cook Thai food at home you can make it super healthy with coconut oil, grassfed meat and wild seafood.

Without further ado, I give you Mission: Yellow Curry PDX, Entry 001. Kesone Thai Lao Bistro.

Kesone Thai Lao Bistro
2600 NE Sandy
http://www.kesone.com/menu.htm

What I ordered:
Lunch special yellow curry with eggplant instead of potatoes, medium spicy, with chicken. Also an order of fresh summer rolls.

Overall Curry Rating: 2

Service: 5
The restaurant is very nicely decorated with a pleasant waitstaff. It only took a couple minutes for my order to come. Looks like they have a full bar set up, in case you want Makers Mark with your stir fried eggplant some evening.

Presentation/Packaging: 1
I actually would give this a 3 on presentation but a 1 on packaging. They piled the rice neatly, a nice touch, but it was surrounded by curdled, brown yellow colored vegetables. They also packed the lunch special in one of those clear plastic, hinged, to go containers which, as usual, broke and I ended up with half of my curry inside the plastic bag. Hot, liquid things should not go in those plastic containers! They just don't hold up!!

Portion Size and Price: 4
I paid 6.50 for the curry and 3.50 for the rolls. The curry was a perfectly decent size portion so I'm happy.

Flavor complexity: 1
It smells alright, but it just doesn't have much taste at all. Kinda turmericky. Yeah. Just say no.

Overall flavor: 2
I mean, I ate it all. It's still curry. But as noted before, it was curdled a bit, and had no complexity of flavor at all. The eggplant was well cooked (this can be a problem sometimes) but the chicken was almost overcooked. And the rice wasn't even that good - like they used "long grain rice" instead of jasmine or basmati.

Anything else I ordered: 3
The summer rolls were quite nice - hard to mess those up though. I've had more complex peanut sauces before, but it wasn't unpleasant in anyway.

Last thoughts:
I might give these guys another try - if nothing else was open anywhere else in town. I guess I would like to see how they handle stir fry and noodle dishes, but this curry does not bode well for them.

Friday, January 23, 2009

Goose Trois - The Potatoes

This is the part I was really looking forward to - potatoes fried in goose grease. It was everything I wanted and more.

To fry potatoes:

1) Cook a goose and render out 1 pint of goose grease.
2) Spend years seasoning a cast iron skillet until it has a perfect patina of use and fat.
3) Spend months developing the perfect, highly nutritious seasoning salt.
4) Peel, chop and cook potatoes in aforementioned grease in aforementioned skillet with aforementioned seasoning salt.

Easy, huh?


I used russet potatoes here and they turned out great. I do like yukon gold potatoes, and you don't even have to peel them. Use whatever you have avaliable.

I seasoned the potatoes, as I season all potatoes with my special, soon to be patented (not really, but maybe - know a patent lawyer?) chile grill salt. It is based on SN from Everything Free Eating's seasoned salt as well as about a million other recipes on Recipezaar. It is chok full of healthful spices and has such an unassuming flavor it can really be used anywhere. Sea salt includes many trace minerals not found in table salt. I use Real Salt, but other sea salts are just as good. Chiles and turmeric are full of antioxidants and cancer fighting nutrients especially needed when grilling or frying food. I use mostly New Mexico chile powder to keep the scovilles down, but a little Arbol or cayenne would kick up the heat nicely. I find Spice Hunter New Mexico chile powder at my local grocery stores. Kelp is a wonderful source of iodine and other sea minerals and doesn't add any noticeable flavors to this mixture. Onion and garlic are also known for their anti-biotic and anti-cancer properties. You just can't go wrong with this stuff!


Alyss' Chile Grill Salt
2 tablespoons sea salt
2 tablespoons paprika
2 tablespoons mild chile powder, or a mix of mild and hot powder
1 tablespoon turmeric
2 teaspoons kelp powder
1 teaspoon onion powder
1 teaspoon garlic powder
1/2 teaspoon nutmeg
1/4 teaspoon ground coriander
1/4 teaspoon ground cumin

Combine everything in an empty glass spice jar. Makes about 3/4 of a cup.


I served my potatoes with homemade sauerkraut, ketchup and cheese. Like I said, it was everything I wanted and more.

Wednesday, January 21, 2009

I'll Fritter Anything

I just got home from a 9 hour day. I don't want to cook. I don't even want to think. I know if I eat pizza, though, both my wallet and my body will be sad. What's a girl to do? There are plenty of options out there for getting some real food into your body pretty quickly but it's best if you've done a little work first Most "quick" recipes actually require some prep work, and all quick recipes require you to have at least thought about them beforehand. And then there's zucchini fritters - but more on that later.

My two main go-to meals when I've got no time are quesadillas and soup. Soup is filling, warming, nutritious and ever so forgiving. Kelly the Kitchen Kop blogged about the nutritional wonders of bone broth as well as gave us directions for making stock, and Carrie over at the Thrifty Oreganic wrote up some great "recipes" for throw together soup. I like to sautee up some onions and spices, throw the meat and broth on top and let that simmer while I change my clothes or take the dog for a walk. Then I'm a little more relaxed when it's time for dinner. With leftover rice, canned beans and decent tortillas in the fridge quesadillas take only minutes. I especially like both soup or quesadillas topped with sour cream and homemade sauerkraut.

Today, though, I want to share with you a brilliant fast food dish - zucchini fritters. I originally got the idea from the Joy of Cooking and have been making it for years. The great thing about this recipe is that really all of it, except the egg and the cast iron skillet, are optional.


Zucchini Fritters
* Necessary:
Grated zucchini
Sliced or grated onion
Egg
Flour (white or whole wheat)
Salt and pepper
* Good to have, but optional:
Cooked brown rice and/or bread crumbs and/or crumbled crackers
Crumbled feta cheese or some other crumbled or grated cheese.
* Even more optional:
Dried green herbs (try herbs de provance or thyme)
Chopped fresh green herbs or green onions.

*Grate zucchini and toss with onion. Add in rice or cracker crumbs and salt, pepper and and any other add ins like cheese or herbs. Crack an egg in the bowl and mix around real good. How much egg you need depends on how big your zucchini is (and how big your egg is) - I would say one 1 cup of zucchini to 1 egg, but that is a very rough guestimate.

*When the veggies are all incorporated in the egg then add a tablespoon of flour. Mix around until thats incorporated and then maybe add another. I would guess I usually add 3 tablespoons of flour to one egg, but again, rough guestimate. If you don't add enough flour the fritter doesn't hold together as well, but it's still totally edible.

*Heat up your cast iron skillet (what? you don't have a cast iron skillet?? Then get off the computer and go buy one. At a thrift store. Seriously.) and melt some fat in it. I like bacon grease, or coconut oil. We're not deep frying here, just lubing up the pan.

*When the skillet is good and hot dollop the batter into the hot fat. When the bottom is nicely browned and the top starting to look dry flip it. Cook till the bottom is browned. Serve with ketchup, ranch, mustard, chutney or ice cream. Not really, but maybe... :)

These guys really take just a few minutes, and just a few ingredients. The eggs and zucchini are real food with real nutrition as is cheese if you use it. Brown rice, especially if cooked with bone broth, and the onions are also nutritious. Using white flour is probably actually nutritionally preferable in this case because we aren't doing anything to neutralize the phytates. It's only a couple tablespoons split up between the fritters so I don't worry too much about it. And we here at Real Food, My Way love frying things in good fats like bacon grease and coconut oil. We know we're getting a good nutrition boost when we cook food that way.

Remember - this "recipe" is really, really loose. Don't have zucchini but do have lots of leftover rice? Make rice fritters. Have leftover cooked greens? Greens fritters. Mashed potatoes? Mashed potato fritters! Don't forget to add the bacon to those ones! Tuna or canned salmon? Call them "cakes" instead of "fritters". No food in the house except frozen corn and an egg? Sounds like corn fritters to me.